Kimchi Risotto

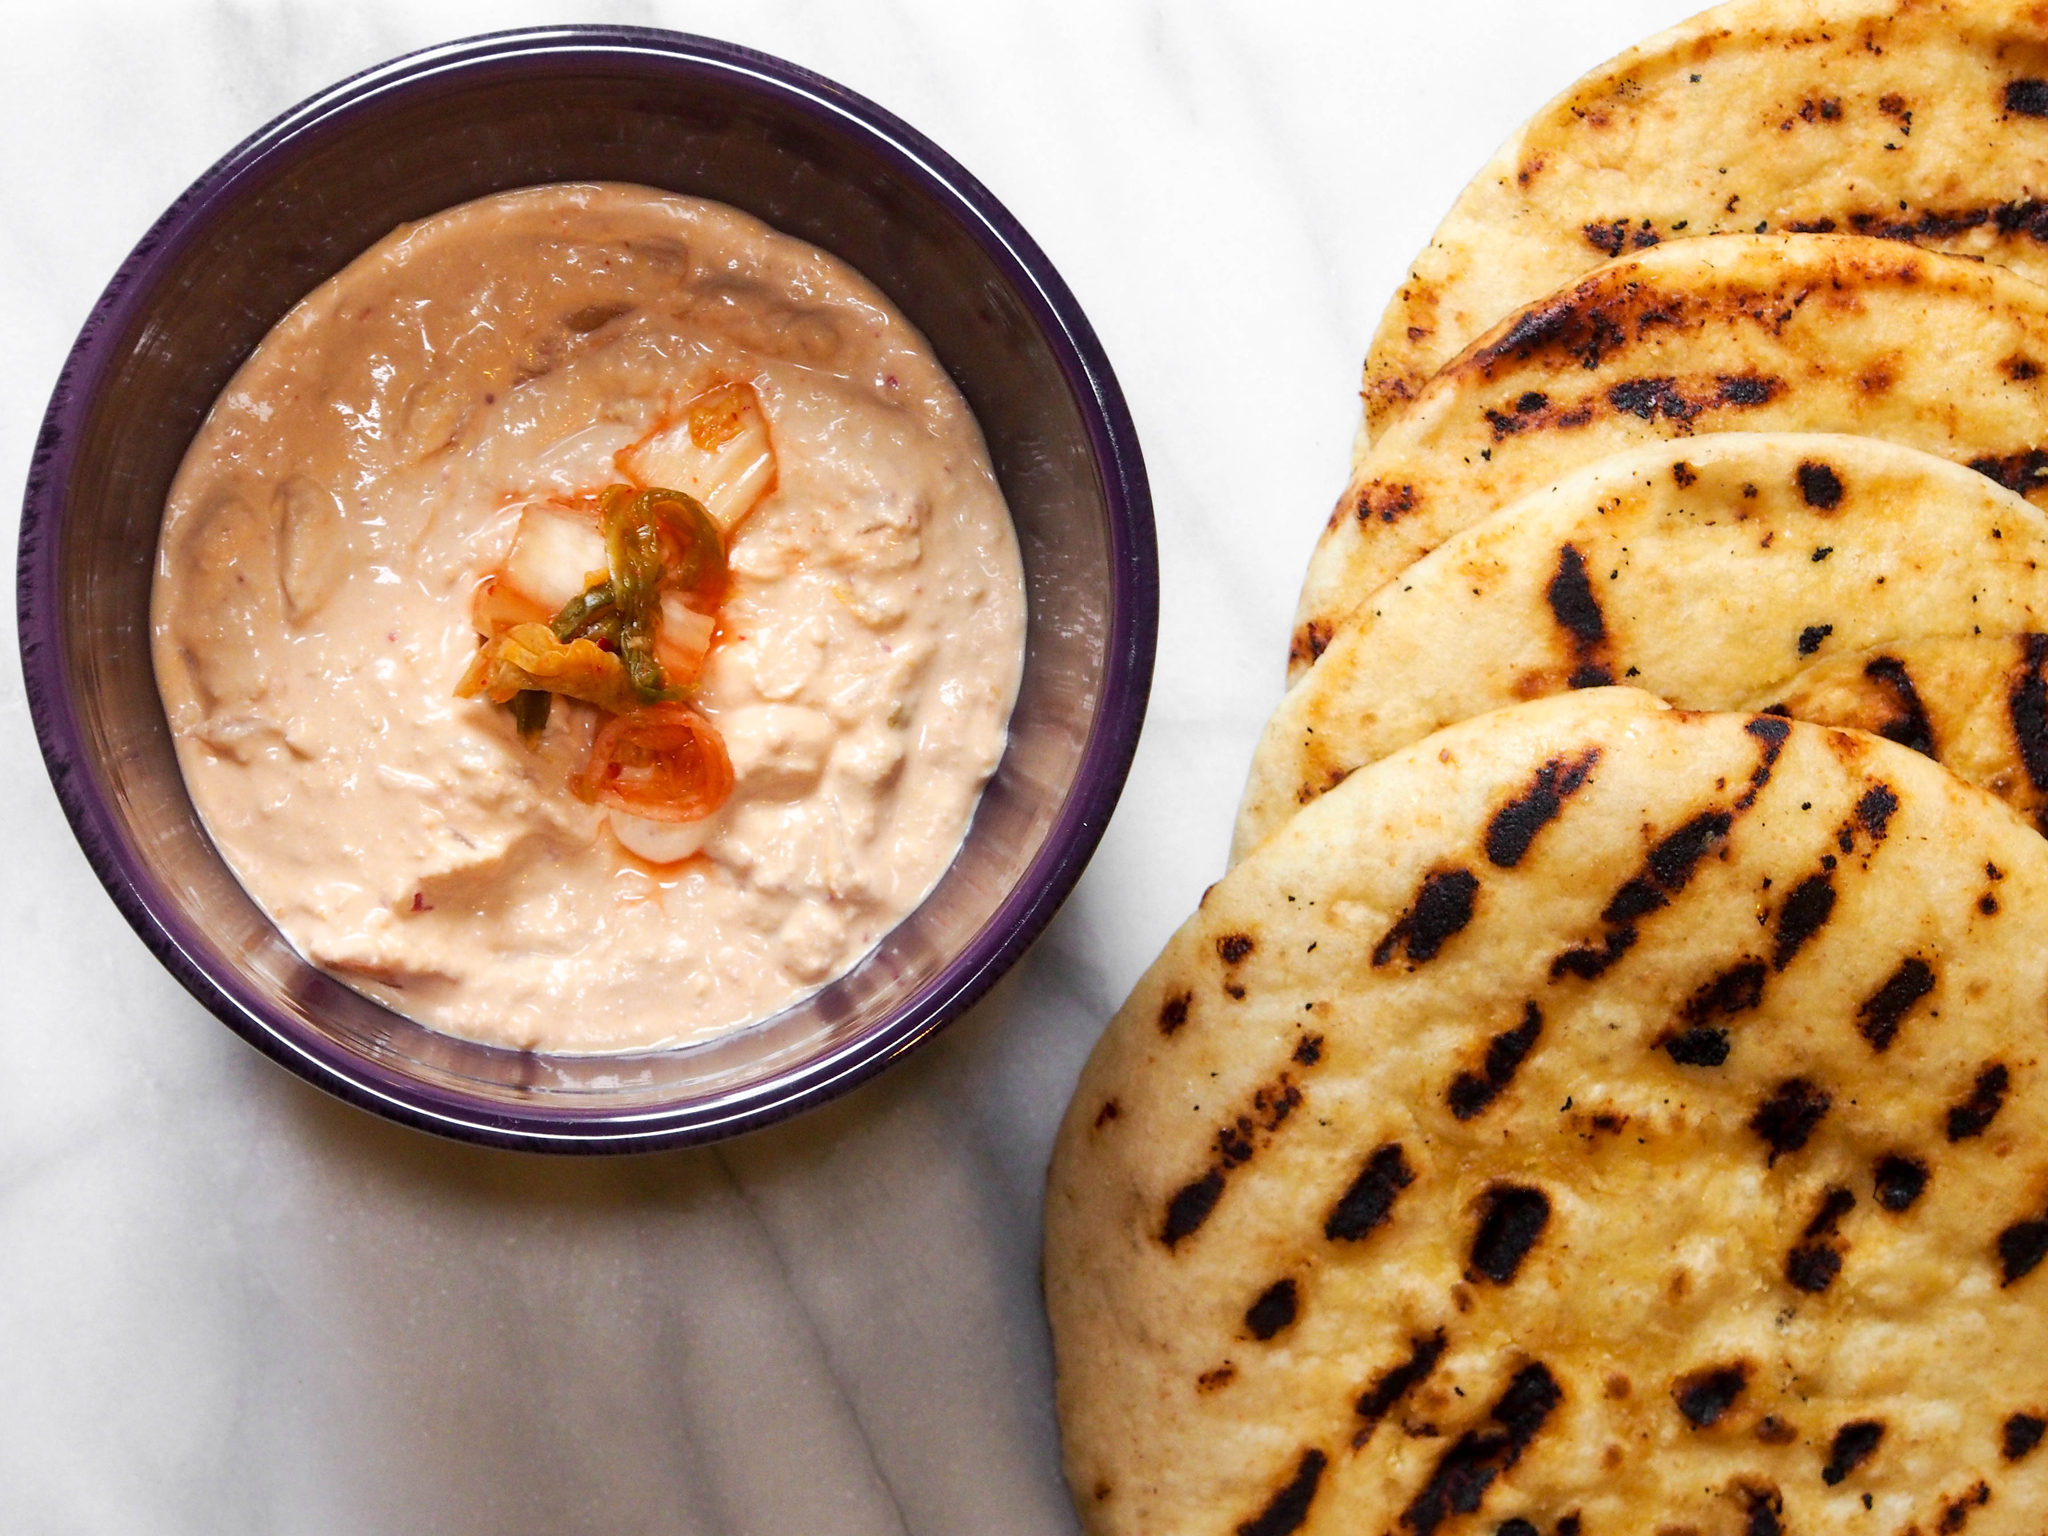
A rainy start to the work week, I wanted to create some new food content as a lot of you have been making several requests as of late. Plus, I've been going through a lot personally, and cooking has always been therapeutic, for me, at least. Eating well never sucks and having others enjoy the food I make results in me being happy, which also never sucks :) So let's talk about this wonderful recipe I tried out - it's nutty, buttery, and tangy with just the right amount of heat, and perfect for a chillier day like today... kimchi risotto! What the heck did I just say?!
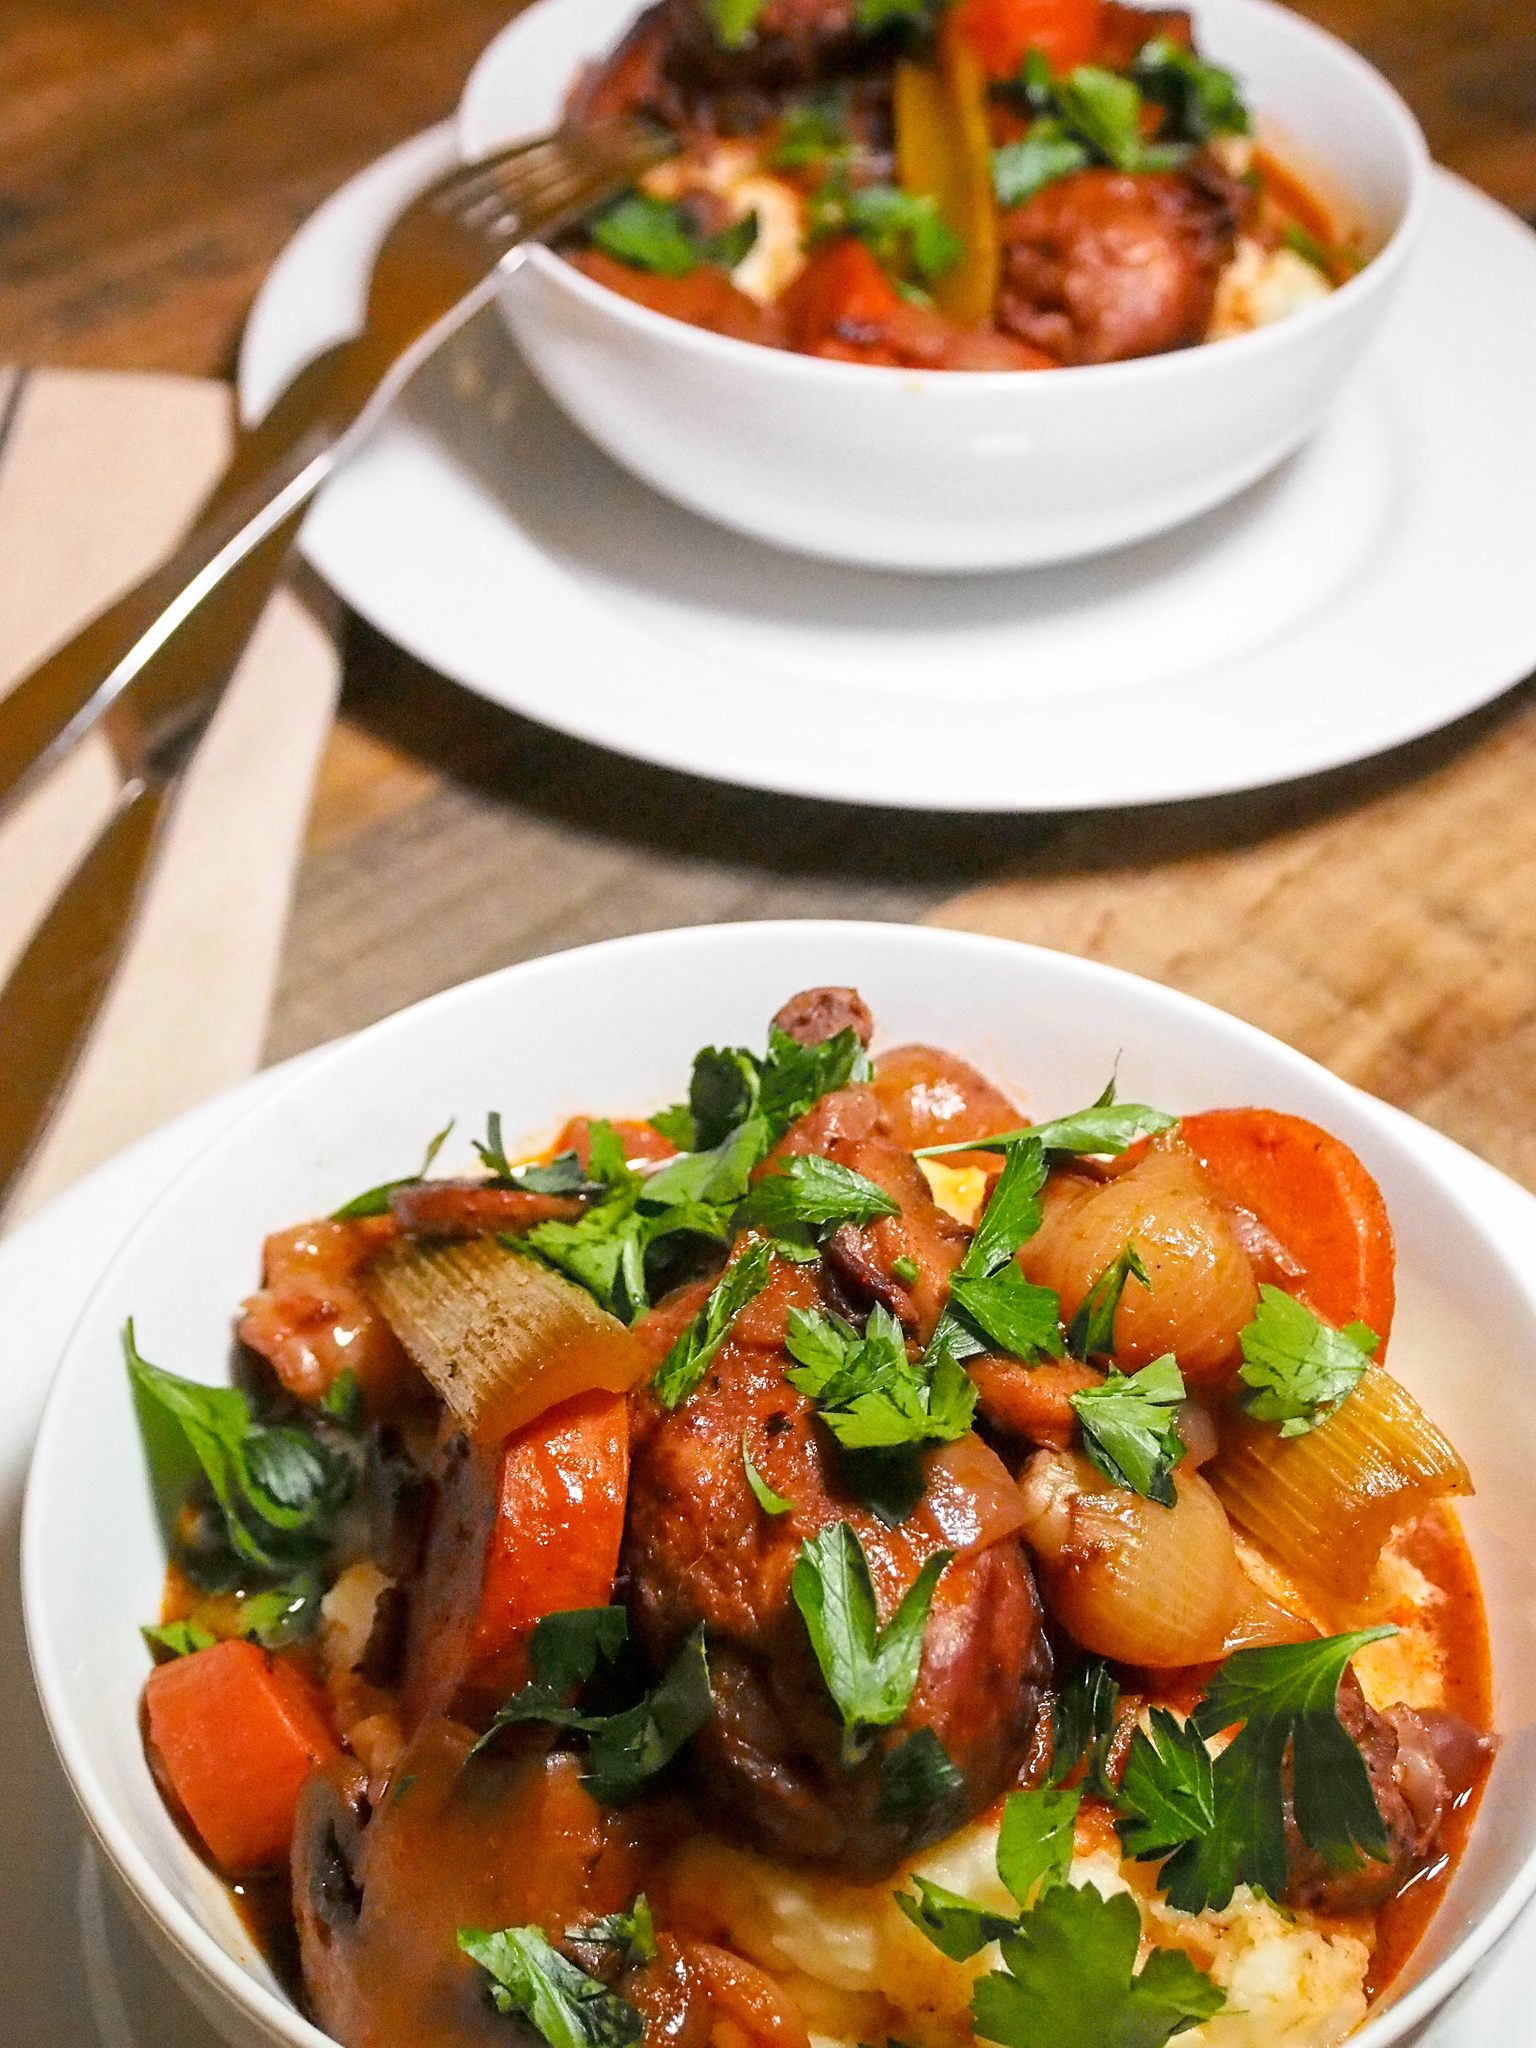
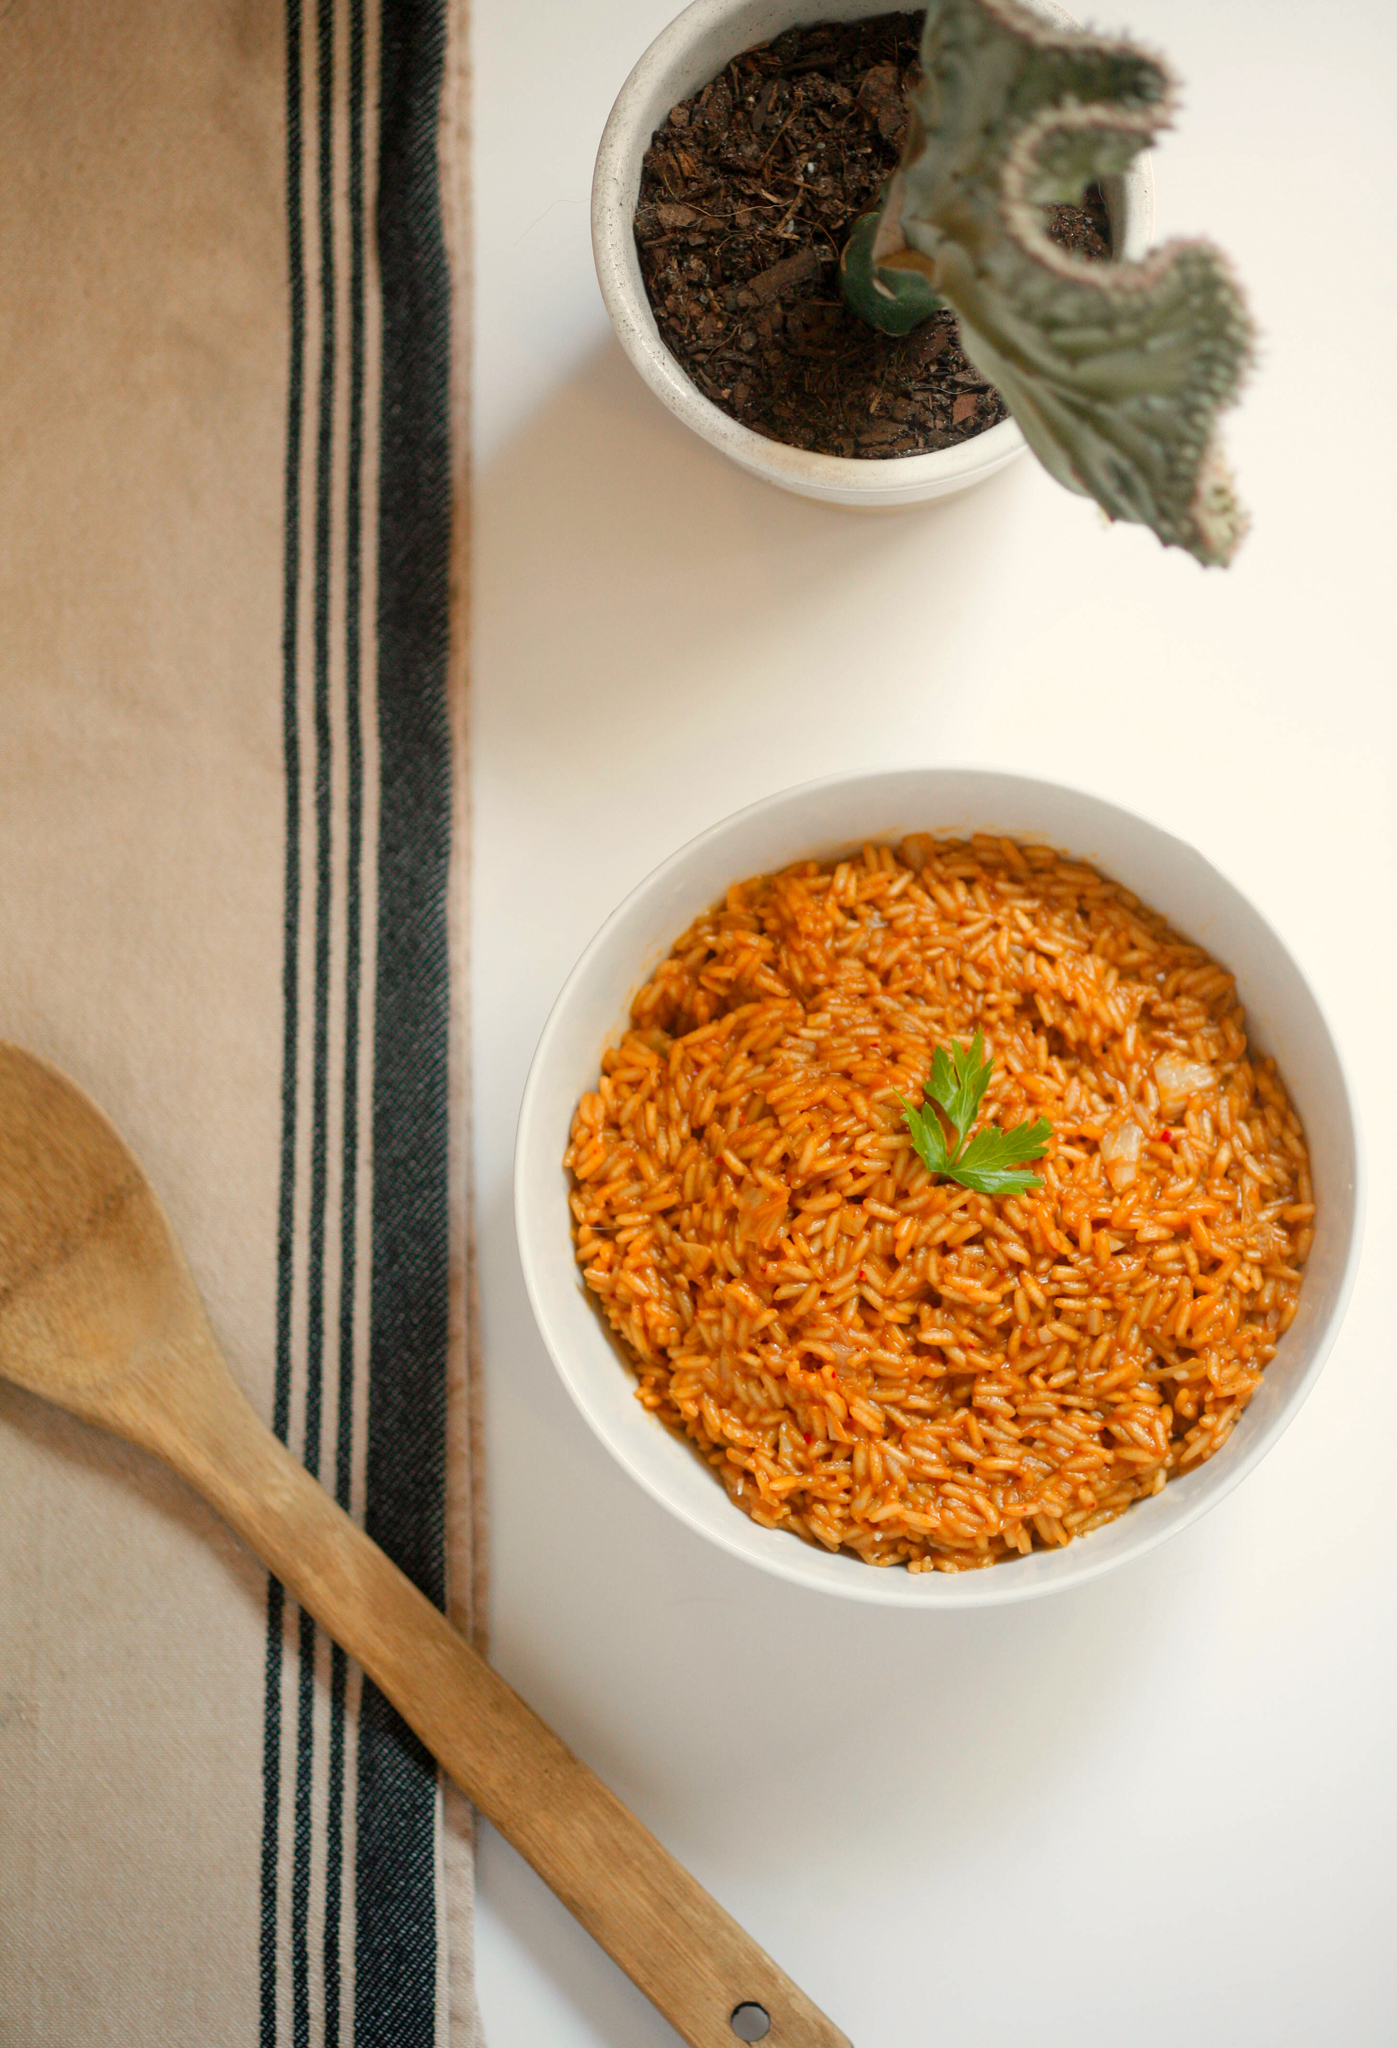
Kimchi Risotto

photos by © Suzanne Spiegoski

photos by © Suzanne Spiegoski

Serves 2

Ingredients:

1/2c Kimchi juice (squeezed from kimchi)
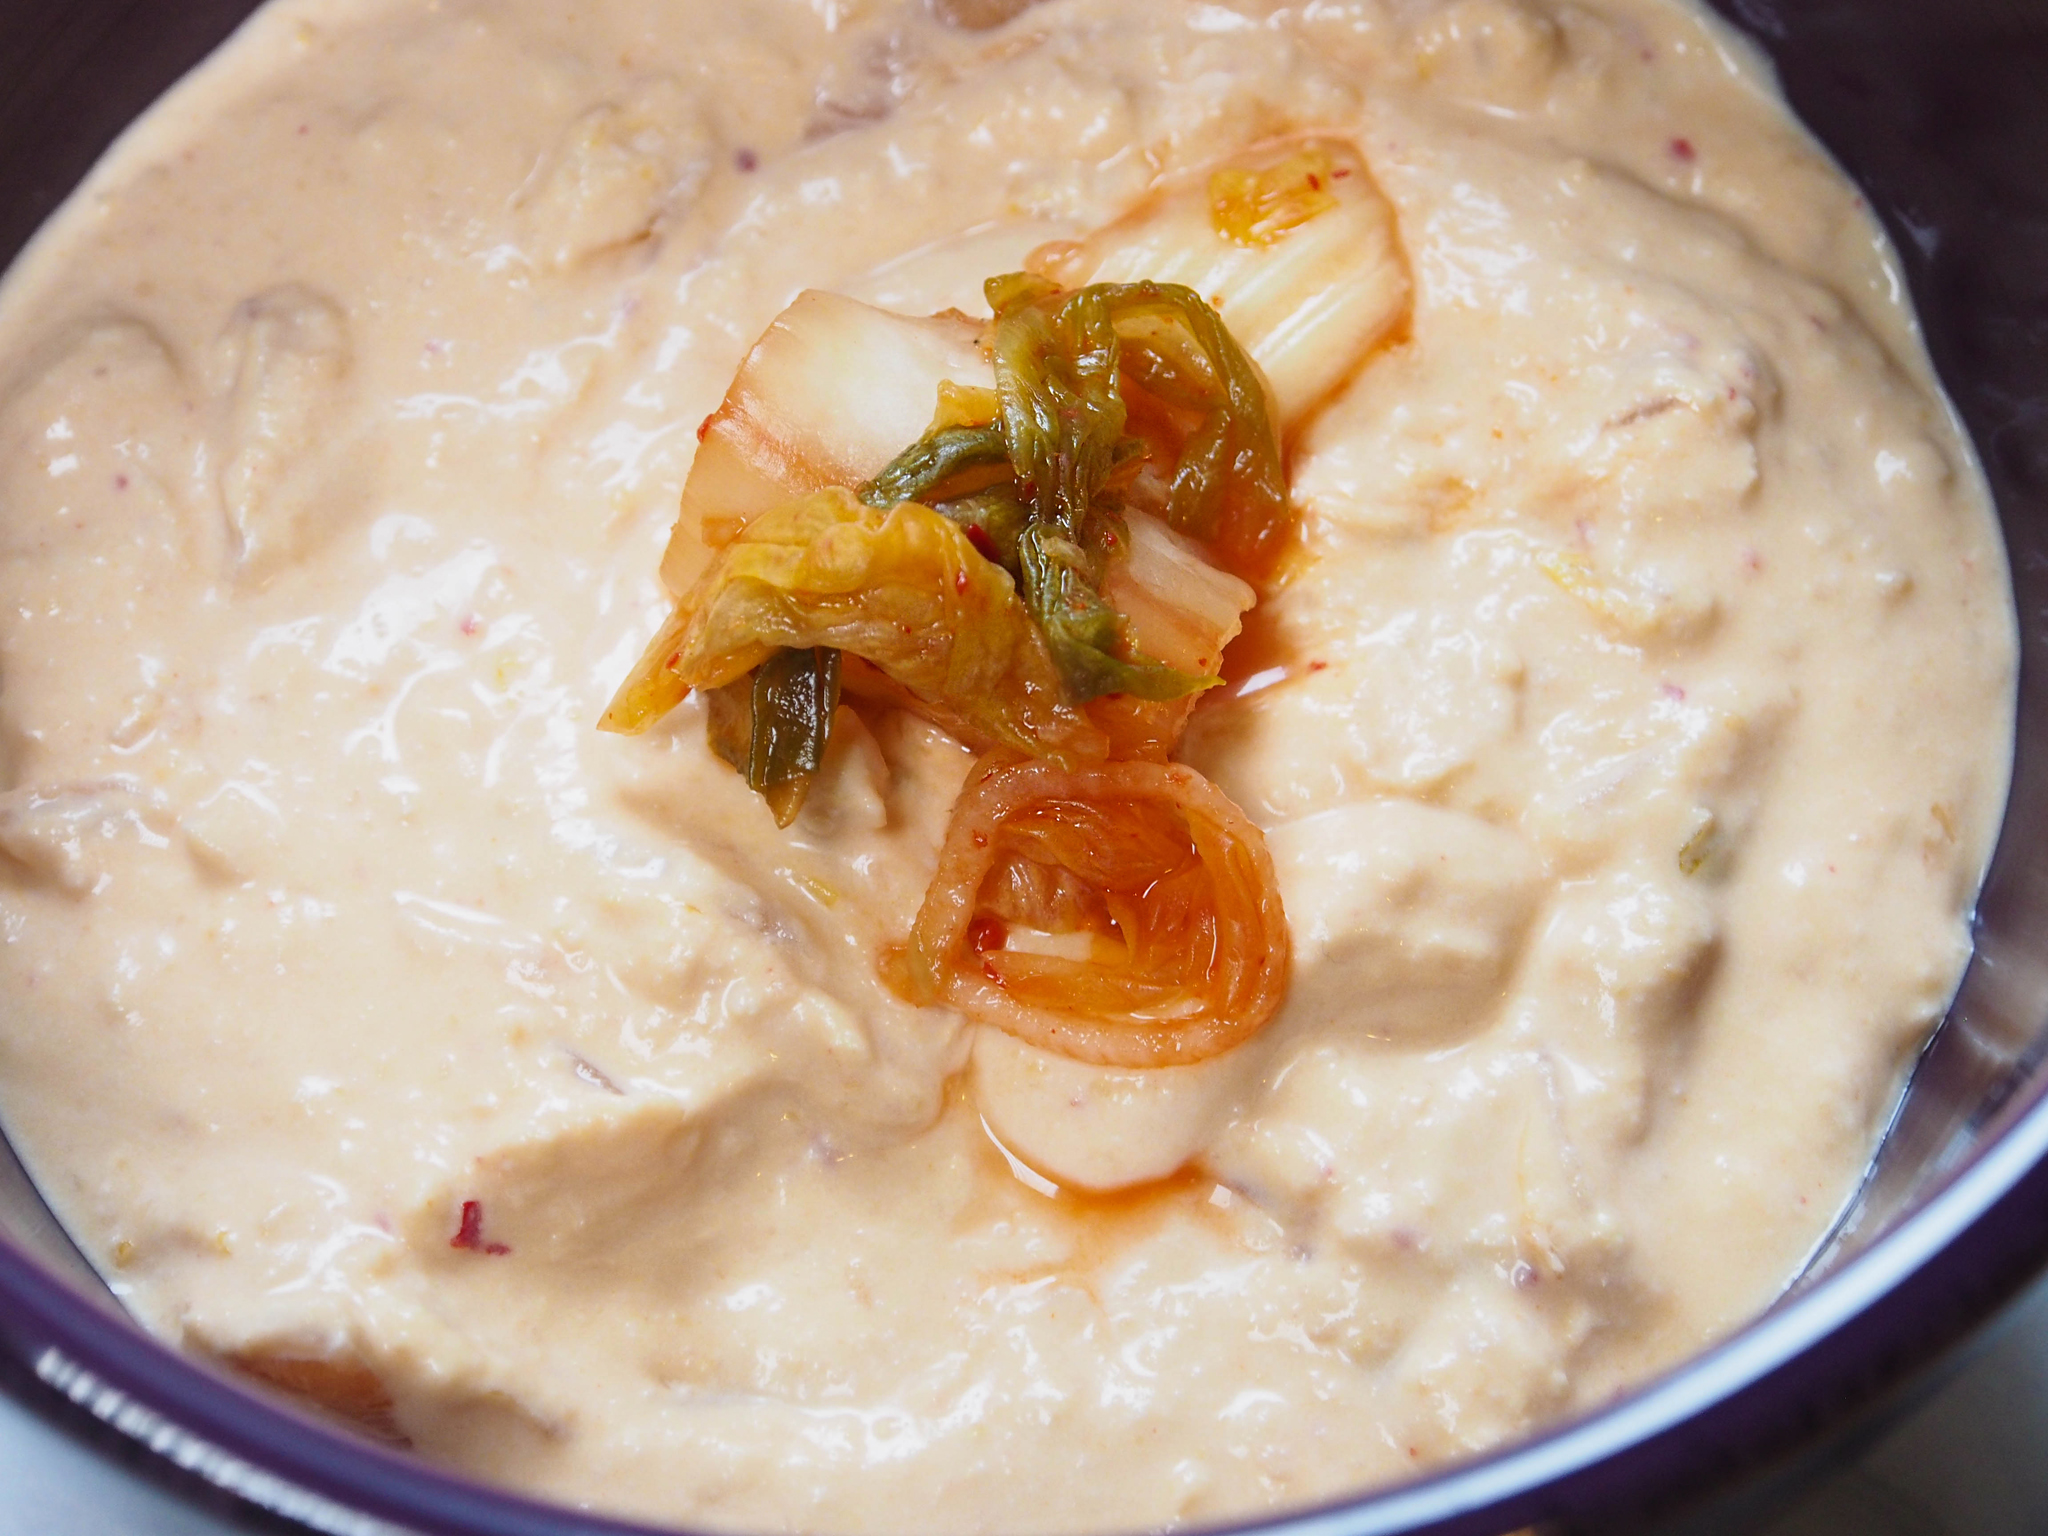
1/2 Kimchi (minced)

3c Vegetable stock

2Tbsp butter

2 Cloves garlic (minced)

1c Sushi rice

3-4Tbsp Gruyére cheese (grated with a microplane)

Directions:

  1. Squeeze the juice out of the kimchi using your hands to make 1/2 cup of juice and then weigh out 100 grams of squeezed kimchi. Mince the kimchi.

  2. Pour the vegetable stock into a pot and bring to a simmer over high heat. Turn down to low to keep warm.

  3. In another pot, add the lard and garlic and saute until fragrant.

  4. Add the minced kimchi and continue sauteing until the kimchi is translucent.

  5. Add the rice and stir until the rice has evenly absorbed all the oil.

  6. Add the kimchi juice along with a ladleful of hot vegetable stock and stir the rice until most of the water has been absorbed.

  7. Continue adding vegetable stock a ladleful at a time and stirring until the rice is your desired consistency. You may not need all the stock.

  8. When the rice is done, add the grated Gruyère and stir into the risotto. Serve immediately.

I know, initially the idea sounded a bit peculiar. Swiss cheese with kimchi and sushi rice? But the combination of flavors go wonderfully within this dish, and though I've made risottos in the past, I've never tried a fusion recipe of this kind before. And the results were sublime, I'll tell you! One of my favorite dishes is risotto, which would make sense given I'm such a rice girl. But the creamy warm flavors delight my taste buds, as I'm sure they do yours. I love a mean, mushroom risotto, but this kimchi risotto certainly takes the cake! The flavors are really all there, you don't even need to add salt! 

I normally use arborio or baldo rice when it comes to making risotto, but I found sushi rice to be an interesting type of rice to use in this fusion recipe. Though this recipe is derived from here, I did a bit of my own tweaking in terms of measurements and the different use in rice. You could also try using a different form of kimchi, such as turnip/radish, which would still bring the acidity into the risotto. I'd love to give a zucchini kimchi a go, what do you guys think about the sounds of that? 

Here are a few tips to achieving the ultimate risotto: Number one - the broth you use to mix the risotto should be very heat, it better cooks down the rice giving it that smooth, creamy goodness that should be when making risotto. Number two - you can use lard instead of butter should you want a more rich flavor but I like to eat pretty healthy (not that butter is any healthier lol), should you not want to use butter at all, you can try making it with coconut oil! And lastly, when it comes to making your own risotto, try to live a little on the wild side. Mix up the flavors, try something you haven't tried before. Get creative. After all, that's part of the fun when it comes to cooking, am I right or am I right? :) 

LOVE & XX'S,

FOLLOW MAQ + SUZ

OTHER SIMILAR POSTS

Rosemary Peach Gin Cocktail

Sponsored Post: Message for 21+. This post is sponsored by Seagram’s, but the content and opinions expressed here are my own. Play it Smart. Drink Responsibly. 


Rosemary Peach Gin Cocktail

Cocktail recipe + photos by © Suzanne Spiegoski

Cocktail recipe + photos by © Suzanne Spiegoski

Serves 2

Ingredients:

2 Peach

4 Rosemary Sprigs

2 Tbsp Freshly-Squeezed Lemon Juice

1 20 oz. Ginger Ale

4 Tbsp. Rosemary Simple Syrup (1/2 Cup of Sugar, 1/2 Cup of Water, bring to a boil, remove from heat, add rosemary sprigs, stir, and let cool. Chill until ready to use.)

3 oz. Seagram's Extra Dry Gin

Directions:

  1. Thinly slice half of peach. Make ice cubes with them by first adding the slice in each cube before adding water.

  2. In a cocktail shaker, add ice, rosemary syrup, lemon juice, ginger ale and Seagram's extra dry gin. Shake well.

  1. Pour over crushed ice evenly between two glasses.

  2. Garnish with extra peach slices (optional) and rosemary sprigs. Serve immediately.

Happy Sunday, guys! I know I said I was going to post up a new cocktail recipe on Monday, but I was just too excited to wait until then! So here you have it, folks... a rosemary peach gin cocktail just in time for cocktail hour! It's always 5 'o clock somewhere, am I right? This recipe is so easy and delicious, let me tell you how to create this wonderful concoction! It'll be the perfect drink to unwind with for the rest of your weekend! Just peachy :)

I started with making ice cubes, but not any regular ice cubes, I put in some peach slices to bring a subtle flavor and fresh look to the drink. I've seen others use edible flowers, lavender, and other herbs when making ice cubes. And it's a great way to lightly infuse an adding taste while you drink it! The secret to the rosemary syrup is here: 1/2 Cup of Sugar, 1/2 Cup of Water, bring to a boil, remove from heat, add rosemary sprigs, stir, and let cool. Chill until ready to use. 

When the rosemary syrup is ready to use, I added it into a cocktail shaker with regular ice, lemon juice, ginger ale and Seagram's Extra Dry Gin. Shake well (be careful when you open ha ha!) and pour over glasses with added peach cubes, (about 3 per drink). Garnish with peach slices (this is optional as I didn't do it as I felt it would've clutter the beautiful peach cubes) #foodphotography #problems #lol and rosemary twigs. Hope you guys enjoyed this recipe and will give it a try! It's the perfect spring/summer cocktail! Let me know what you think. Can't wait to start doing more cocktails in the future! Until next time, thanks for stopping by and I hope you all had a great weekend!

LOVE & XX'S,

SHOP THE PRODUCT

FOLLOW MAQ + SUZ

OTHER SIMILAR POSTS

Korean Coq Au Vin

Happy Friday and Happy St. Patrick's Day, everyone! Kiss me, I'm Korean (and Polish)! ;)

In light of the 'blizzard' this week here in NYC, we got lucky. Expecting over 2 feet turned over to only about a foot and the conditions were mostly icy with frigid temps! I bet a lot of you are looking forward to spring just as much as I am! With a snow day on our hands midweek (seriously everything was closed, from schools to banks... even Starbucks!), I cooked up more of a fall/winter dish that I've been dying to make. A well known French dish, I also wanted to put a twist on it and created a Korean Coq au vin.  

Korean Coq Au Vin

Serves 2-4

photos + recipe by Suzanne Spiegoski

photos + recipe by Suzanne Spiegoski

Ingredients:

24 to 30 pearl onions
4 chicken thighs and legs, or 1 (5 to 7-pound) stewing chicken
¼ to ½ c AP flour
2 Tbsp water
6 ounces bacon, chopped
8 ounces button mushrooms, sliced
1 Tbsp butter
2 bottles red wine, preferably pinot noir or cabernet
2 Tbsp Gochujang
2 Tbsp tomato paste
1 medium onion, chopped
2 stalks celery, quartered
2 medium carrots, quartered
3 cloves garlic, crushed
6 to 8 sprigs fresh thyme
1 bay leaf
2 cups chicken stock

Directions:

Preheat oven to 245 degrees F.

Cut off the root end of each pearl onion and make an "x" with your knife in its place. Bring a pot of water to a boil and drop in the onions for 1 minute. Remove the onions. Allow them to cool, and then peel. You should be able to slide the onions right out of their skin. Set aside.

Sprinkle the chicken on all sides with salt and freshly ground black pepper. Place the chicken pieces, a few at a time, into a large sealable plastic bag along with the flour. Shake to coat all of the pieces of the chicken. Remove the chicken from the bag to a metal rack.

Add the 2 tablespoons of water to a large, 12-inch sauté pan over medium heat along with the bacon. Cover and cook until the water is gone, and then continue to cook until the bacon are golden brown and crispy, approximately 8 to 10 minutes. Remove the salt pork from the pan and set aside.

In the same pan, using the remaining fat, add the pearl onions, sprinkle with salt and pepper, and sauté until lightly brown, approximately 8 to 10 minutes. Remove the onions from the pan and set aside. Next, brown the chicken pieces on each side until golden brown, working in batches if necessary to not overcrowd the pan. Transfer the chicken into a 7 to 8-quart enameled cast iron Dutch oven.

Add the mushrooms to the same 12-inch sauté pan, adding the 1-tablespoon of butter if needed, and sauté until they give up their liquid, approximately 5 minutes. Remove and set aside.

Pour off any remaining fat and deglaze the pan with approximately 1 cup of the wine. Pour this into the Dutch oven along with the chicken stock, tomato paste, gochujang, quartered onion, carrots, celery, garlic, thyme, and bay leaf. Add all of the remaining wine.

Place the chicken in the oven and cook for 2 to 2 1/2 hours, or until the chicken is tender. Maintain a very gentle simmer and stir occasionally.

Once the chicken is done, remove it to a heatproof container, cover, and place it in the oven to keep warm. Strain the sauce in a colander and remove the carrots, onion, celery, thyme, garlic, and bay leaf. Return the sauce to the pot, place over medium heat, and reduce by 1/3. Depending on how much liquid you actually began with, this should take 20 to 45 minutes.

Once the sauce has thickened, add the pearl onions, mushrooms, and bacon and cook for another 15 minutes or until the heated through. Taste and adjust seasoning if necessary, remove from the heat, add the chicken and serve.

*Tips: If you want to do it overnight, just do everything up to putting the chicken in the oven. That part is for the next day :) The longer you marinate, the better the flavor! xo

Coq au vin is a French dish of chicken braised with wine, lardons, mushrooms, and optionally garlic. What are we talkin' bout here, optional?! I LOVE garlic so hell YES you best put those bad boys in with the rest of the ingredients! So what's the Korean twist? Kimchi? Nope. I used a spicy red pepper paste called gochujang. It's a staple paste in Korean cuisine and I thought the already-complex flavors would be killer-good in this dish. And with old school mashed potatoes? Oh YAY. 

What's the secret to the most delicious mashed potatoes of your life? Butter, milk, and salt. That's it. I make sure to really boil the bejeezus out of the potatoes and make sure they're Idaho! I feel like this is the starchiest potatoes and are perfect for mashing. I know I'm sure I've mentioned it before but you guys have no idea how much I LOVE mashed potatoes. I always tell people if I were deserted on an island and only had one choice of food to live off on, it'd be just that. And I'd die a happy woman. HA HA HA! BUTTTTTTT, (enter sad face) I've discovered after experimenting for a few months, that the more dairy products I consume, the more my skin breakouts! Also, did you know that eating more dairy also dries your scalp, leading to dandruff and other skin issues? A good substitute is chicken or vegetable broth, if you want to opt out on the milk in the potatoes.  

Stay tuned for a new post coming up on the blog featuring an amazing NYC-based ethical luxury handbag brand that I had the pleasure of working with! Can't wait to share with you guys our photo shoot! It snowed that day and we had lots of fun taking photos in the Financial District of Manhattan. Soon to come, have a great Friday, friends! For more recipes, check them down below. :)

LOVE & XX'S,

SHOP THE PRODUCT

FOLLOW MAQ + SUZ

OTHER SIMILAR POSTS

Kimchi Hummus

I'm so glad it's the weekend! In the past, I always worked on the weekends and would get up extremely early (we're talking 4:30am folks) just to get to where I needed to be on time. Now, if I had the chance to redo it all over again, would I go back and change anything? No. Would I still want to do that though given the choice? Nope. I bet some of you are wondering what it was that I did to put me in such strange circumstances. I was a figure skating coach on-and-off for ten years. I loved what I did, to the point of sacrificing much of my time for it for a good chunk of my life (I was also involved in the sport long before and trained seriously for also nearly ten years) but I love what I do now even more.   

Weekends now are meant to be my downtime. Throughout the week there's shoots, meetings, events, edits, promos and let's not forget to mention the crazy amount of emails I have to go through on a daily basis. It's a constant hustle and I am not complaining in the least bit, but everybody needs to recharge their batteries and it's really good to make time for your loved ones. Healthy, even. So this is what I try to do on the two days at the end of each week. There is the occasional photo shoot or meeting that'll occur on the weekend. Last weekend I shot & styled  5 looks in one day because my main photographer, who is also my hubby, wasn't going to be available for a while due to work schedule conflicts and that's how I got sick... staying out in the cold too long freezing my butt off ha ha! Totally worth it, though.

Kimchi Hummus

photos + recipe by: Suzanne Spiegoski 

photos + recipe by: Suzanne Spiegoski 

Serves 4-6

Ingredients:

16 ounces can chickpeas

¼ cups kimchi (napa cabbage chopped)

¼ cup tahini sauce

4 tablespoons fresh lemon juice

¼ cup water

Directions:

  1. Add all the ingredients except kimchi a blender. Blend the ingredients on high until smooth. Add in chopped kimchi with juice, omit the juice if you want the hummus to have a thicker base. Serve with naan or pita bread.

But when I have more time I enjoy spending it at home. I love going out and exploring my city, but I love to cook and hang out with my boys. Because I've been so busy working on fresh, new fashion content for you guys (especially more on the regular lately and that it's all a one-person job - aside from my husband taking the photos) it's been rather crazy and I've had no room in my schedule to create more food content! And I know a lot of you have been missing new recipes so I'm going to try to do one once per week. We'll see how it goes and as much discipline as I have, life is unpredictable and I just have to go where the 'wind carries me'. 

On a more delicious topic, can we all get an amen to kimchi hummus?! I LOVE hummus. The rich, creamy texture paired with yummy naan bread is one of my favorite snacks. Even with veggies, like carrot or celery sticks, it's healthy and tastes heavenly. I paired it with kimchi, it's tart acidic flavor blended wonderfully together with the hummus. What's the secret to getting the ultimate creamy hummus everyone wants? The dryer the chickpeas are before you blend them is the trick. I love spiciness so I added in kimchi juice, which is why my hummus's texture is a little more smooth. I also didn't blend the chopped kimchi with the other ingredients for the hummus. 

I suggest blending the kimchi with the main ingredients if you want a creamier, paste-like texture to the hummus. I'm Korean and love kimchi and actually like the added punch it gives when you bite into it here and there. The grilled garlic naan bread goes really well with the kimchi hummus too. I didn't make the bread from scratch but you can get it at the store and grill it over the stove top or in a grill pan of some kind. I used my cast iron grill pan to give it a nice char, the smoky flavor is awesome with the garlic. I'm getting hungry again just talking about this! :) Hope you all have a nice weekend. I'll be back on Monday! 

LOVE & XX'S, 

FOLLOW MAQ + SUZ

OTHER SIMILAR POSTS

Military Latte

NYFW is one day away and when it comes to maintaining the energy of a marathon runner, I've been drinking a whole lot of what's called a military latte. Originally created in Japan and then onto Chicago, I stumbled upon an article a couple of years back about the interesting coffee concoction.

Named for its camo-like surface, the drink is made up of a matcha latte, cocoa powder, espresso and vanilla syrup. I know sometimes it is made with white chocolate but since I'm trying to avoid sugar (I think it's the culprit behind my breakouts) I opted it out of the ingredients when it came to making my own version of it! 

I would love to be one of those cool people that can create latte art such as beautiful leaves, hearts, unicorns and more. They even do 3d art now which is so amazing! This is my first attempt at any kind of latte art and I have to say it's not all that bad! What do you guys think? I also used a larger matcha bowl for aesthetic purposes. The green brings a nice accent with the dusting of the matcha powder. 

Photos + recipe by © Suzanne Spiegoski

Photos + recipe by © Suzanne Spiegoski

Military Latte

Serves 1

(Matcha green tea latte, cocoa powder and espresso)

Ingredients:

6 tablespoons coffee/espresso.

1 1/2 tablespoons matcha green powder

12 ounces milk

1 tablespoon vanilla syrup

dash of cocoa powder

Directions:

  1. Mix espresso, matcha and vanilla syrup together.
  2. Add warm steamed milk.
  3. Sprinkle a dash of matcha and cocoa powder on top to decorate.

What's your energy booster as of late? Are you more of a coffee or a tea drinker? I love both which is why I had the idea to blend both worlds together, to begin with. You can definitely say my cooking is definitely focused on fusion cuisine! I can't wait to share more food content, but fashion week starts tomorrow so stay tuned for lot more content on that for the next couple of weeks! So much more to come, I can't WAIT to share with you what I'll be doing in the next couple of months! 

LOVE & XX'S,

maqandsuz_logo.jpg

FOLLOW MAQ + SUZ

OTHER SIMILAR POSTS