• HOME
  • MaQ + Suz
  • Photography
  • Shop
  • The Fisherman's Lily - A Novel
  • Bio + Inquiries
  • Contact
Menu

Suzanne Spiegoski

photographer | digital creator | stylist | writer
  • HOME
  • MaQ + Suz
  • Photography
  • Shop
  • The Fisherman's Lily - A Novel
  • Bio + Inquiries
  • Contact

Fried Green Tomatoes

April 29, 2016

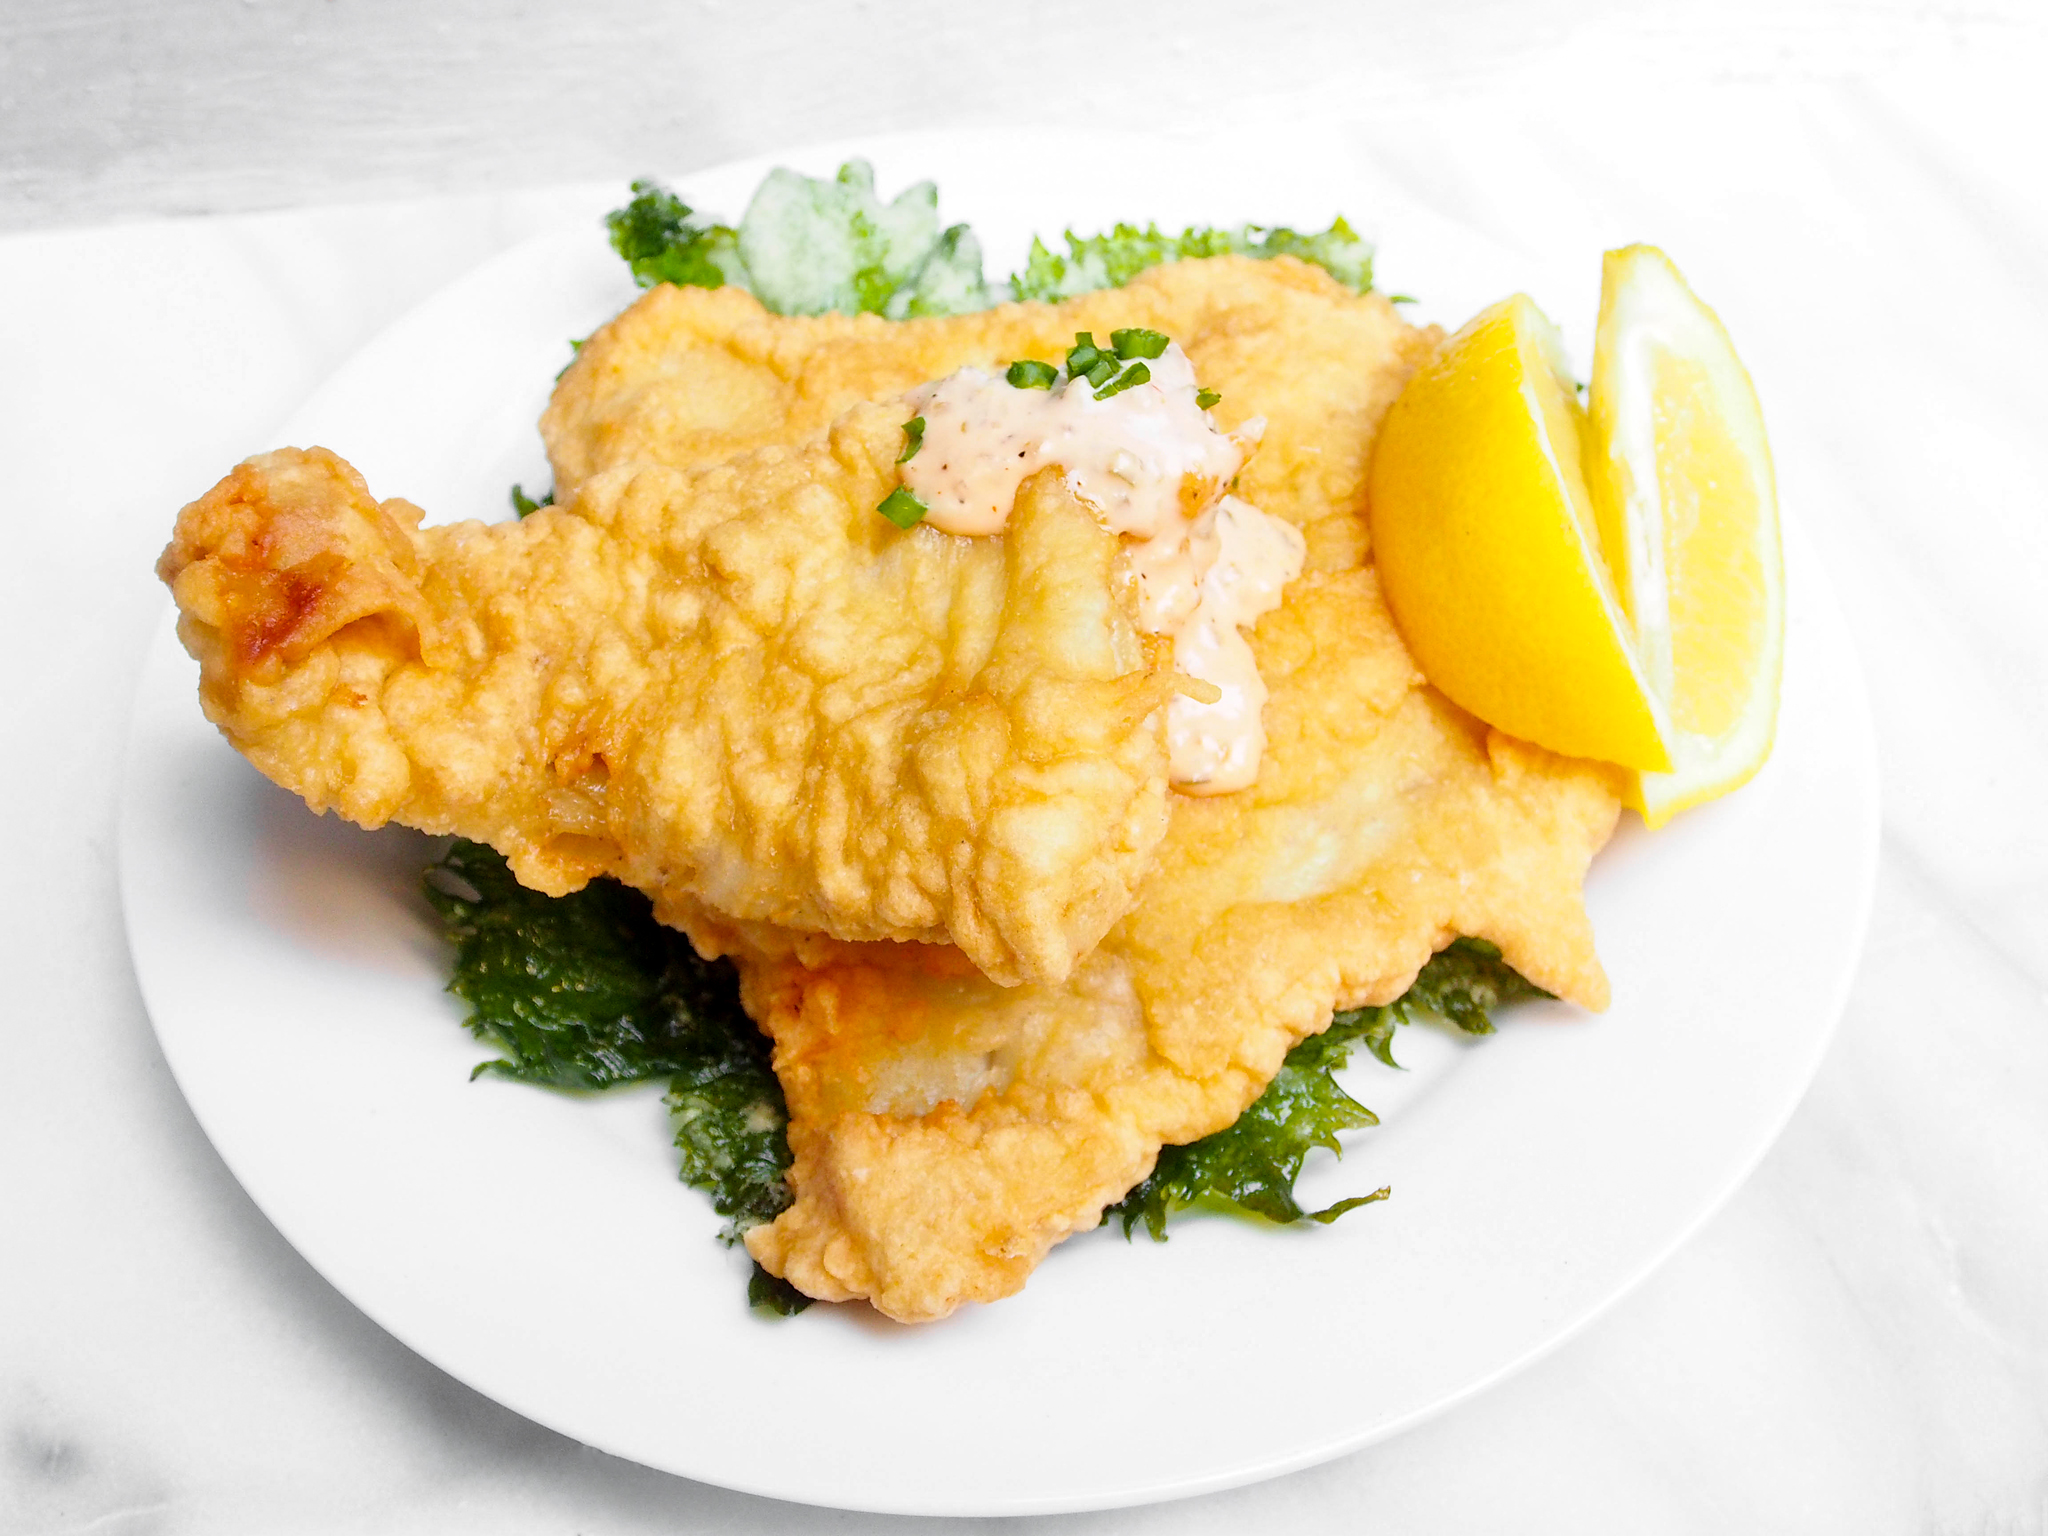
Happy Friday, everyone! I'm so delighted to finally share a recipe it took nearly 20 years in the making! Ever since I was a little girl and saw, 'Fried Green Tomatoes', the movie (the book is entirely something else!), I've been obsessed with the idea of trying to make them. I've tried several variations of this Southern comfort food dish, but never in a Korean-fusion way! So, of course, I had to create my own version!

The first secret to the perfect fried green tomato? Bacon drippings. You know all the grease you get after cooking bacon in the pan/oven? Save that for this recipe! I'm serious! You can even freeze it in the freezer should you want to use it in the distant future. I put mine in a Mason jar and it's seriously what gives the tomatoes it's ultimate flavor. Second? Cornmeal. And yellow. It gives a better color than white cornmeal, in my opinion.

DOWNLOAD RECIPE

Photos + recipe by © Suzanne Spiegoski

Photos + recipe by © Suzanne Spiegoski

Fried Green Tomatoes

Serves 2-4

Ingredients:

1 medium green tomatoes (per person)

Batter:
3/4 c all-purpose flour
1/4 c yellow cornmeal
3/4 c buttermilk
salt & pepper
enough bacon drippings to fill 2" deep in a skillet /pan

Sauce:
2 TB coconut oil
1/4 c all-purpose flour
1 1/2 c milk
1/2 c buttermilk
1 TB ranch dressing
salt & pepper

Directions:
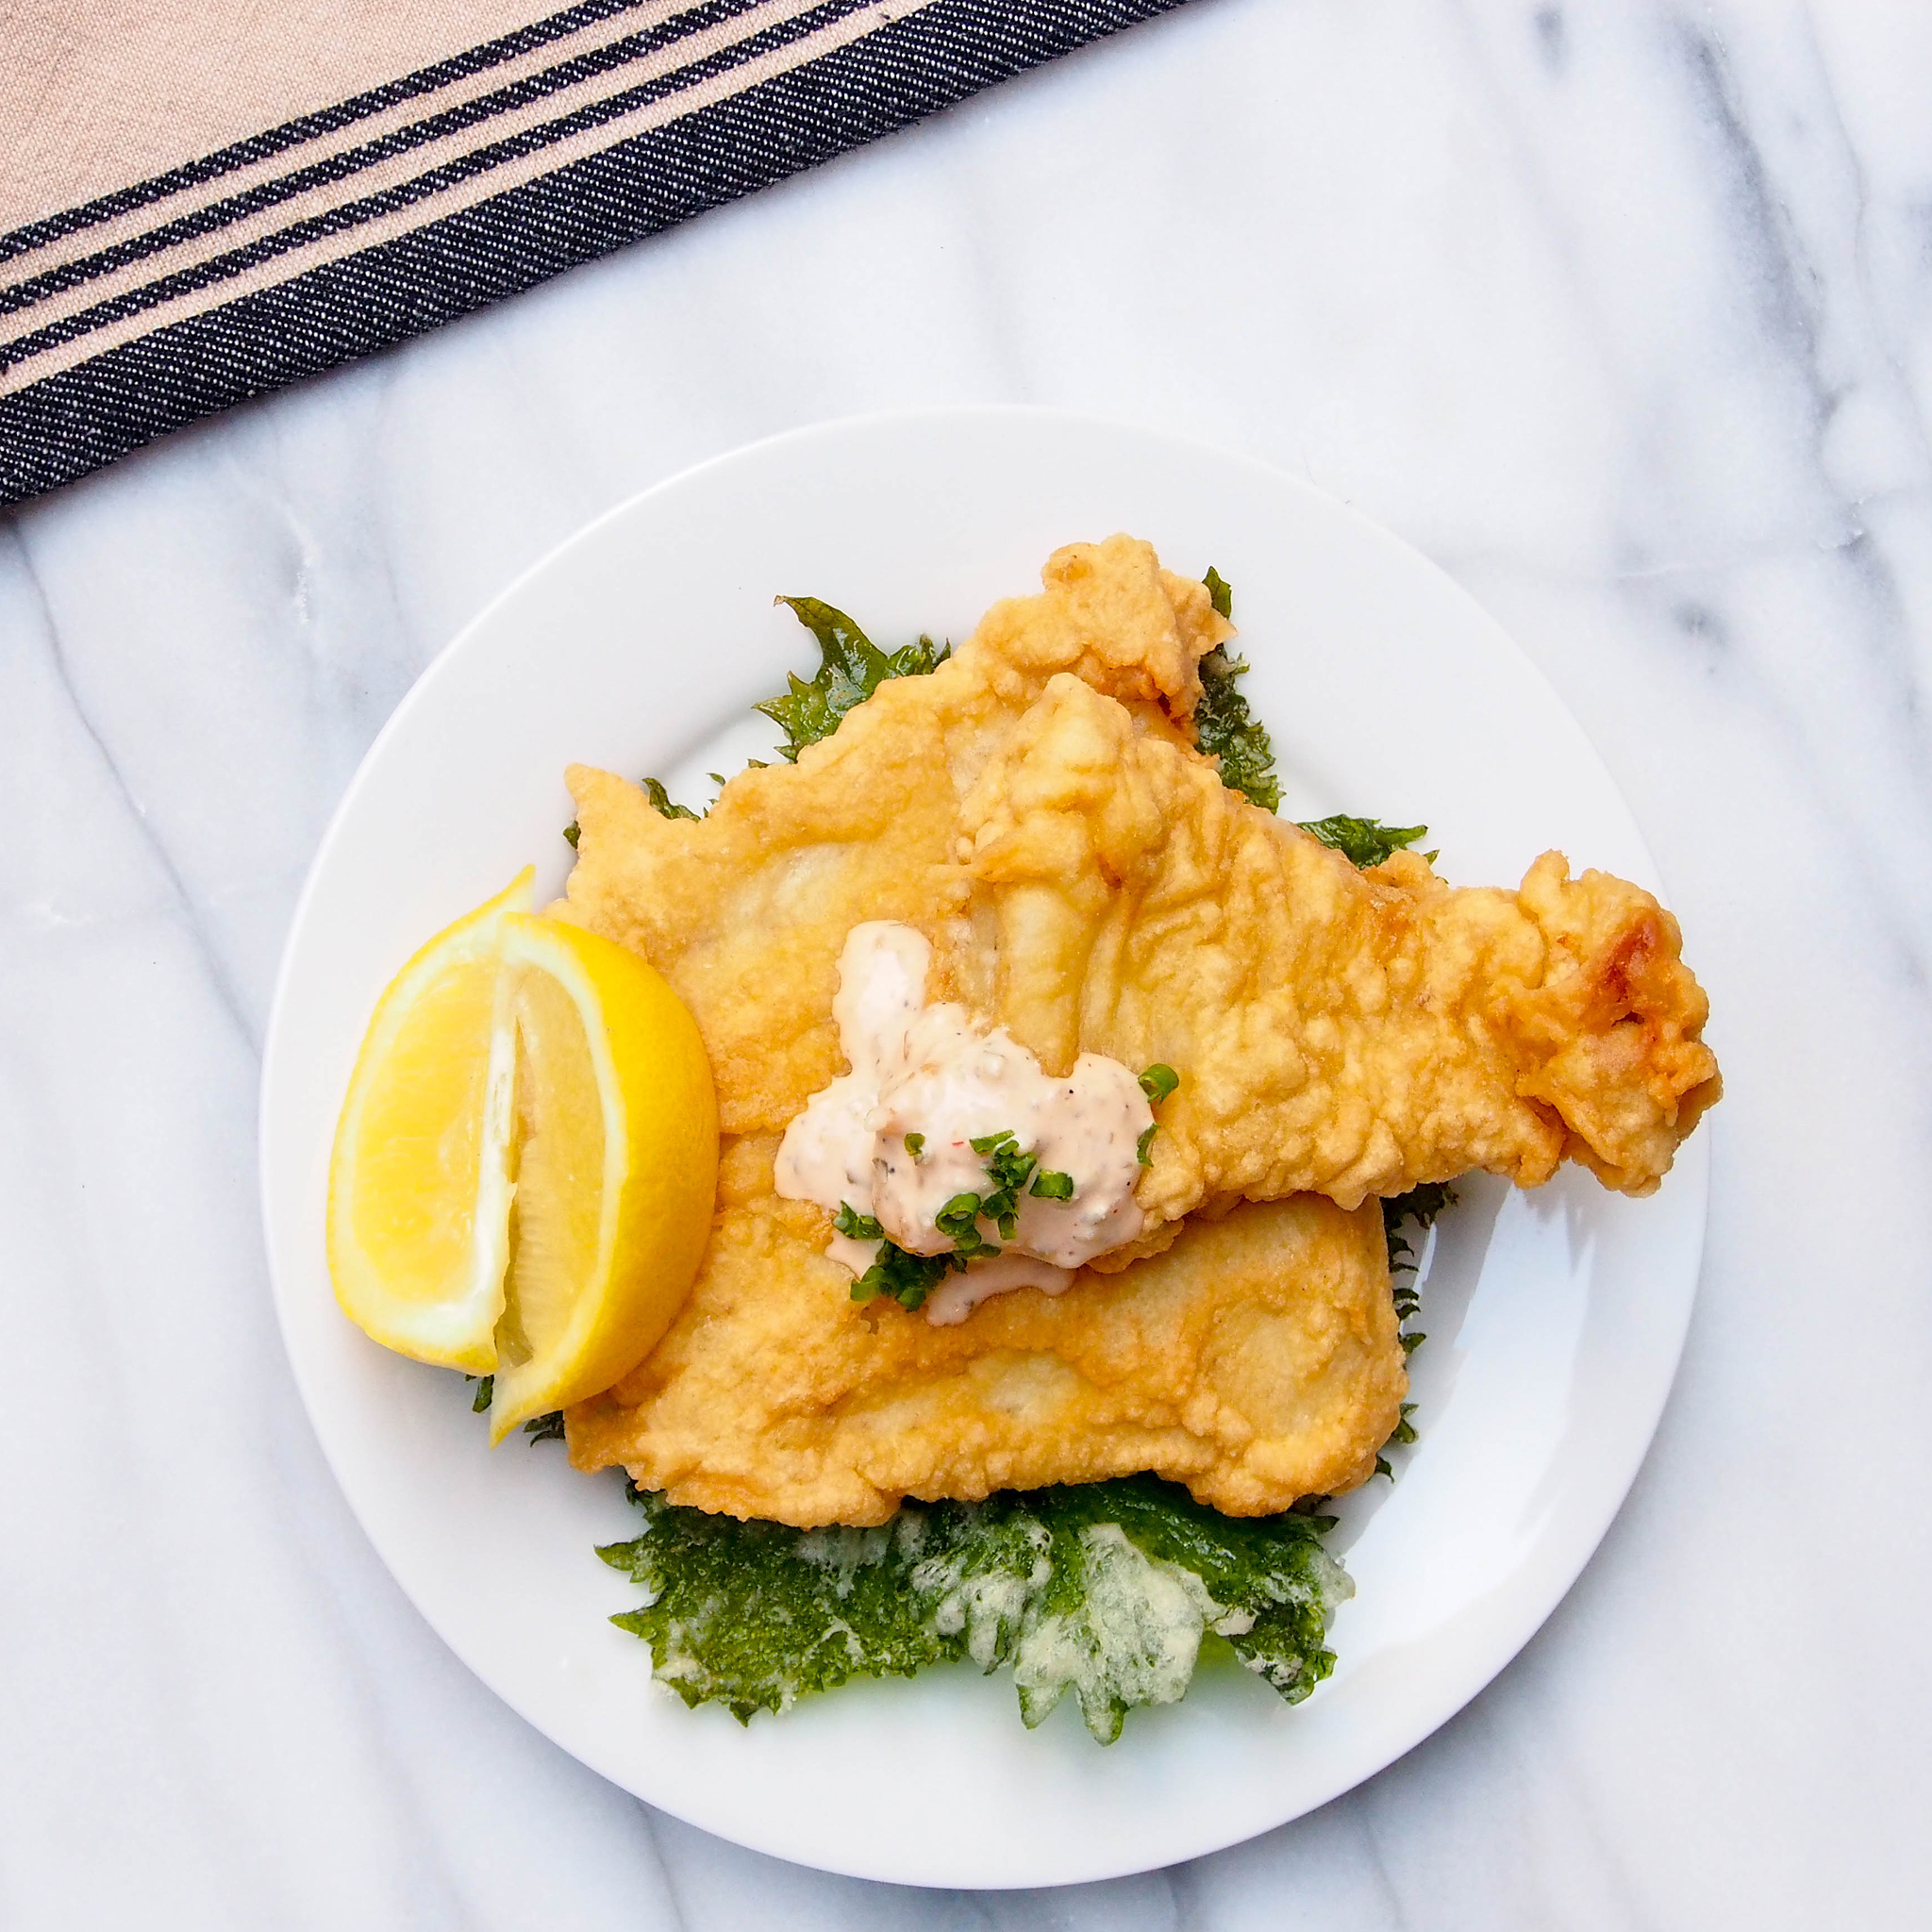
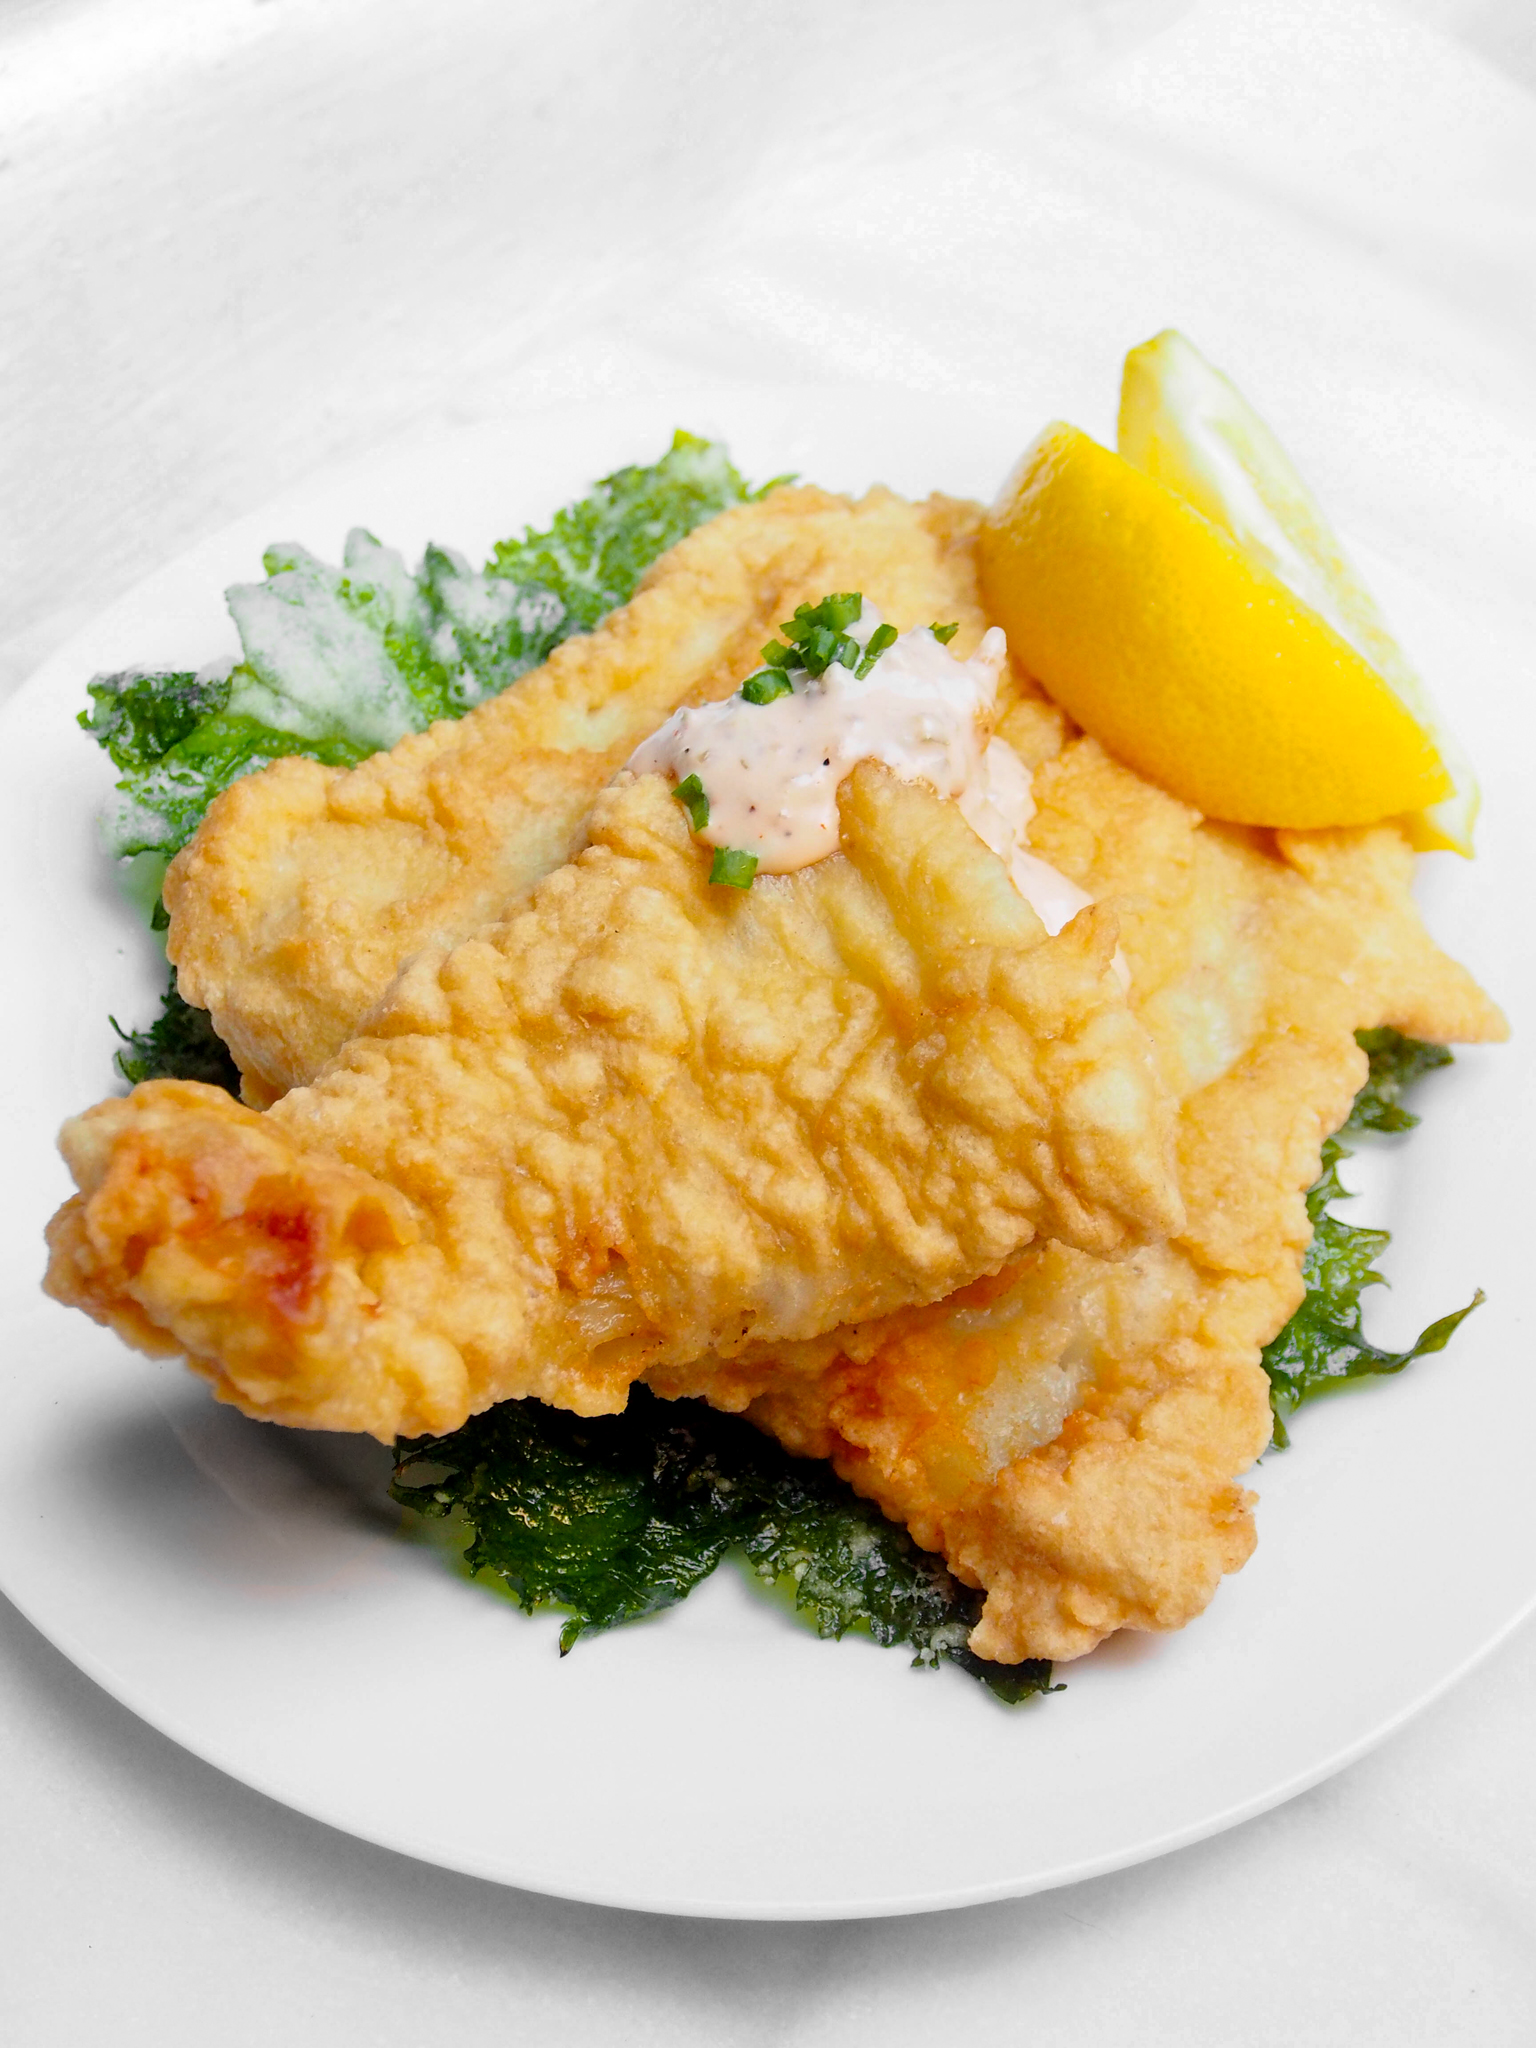
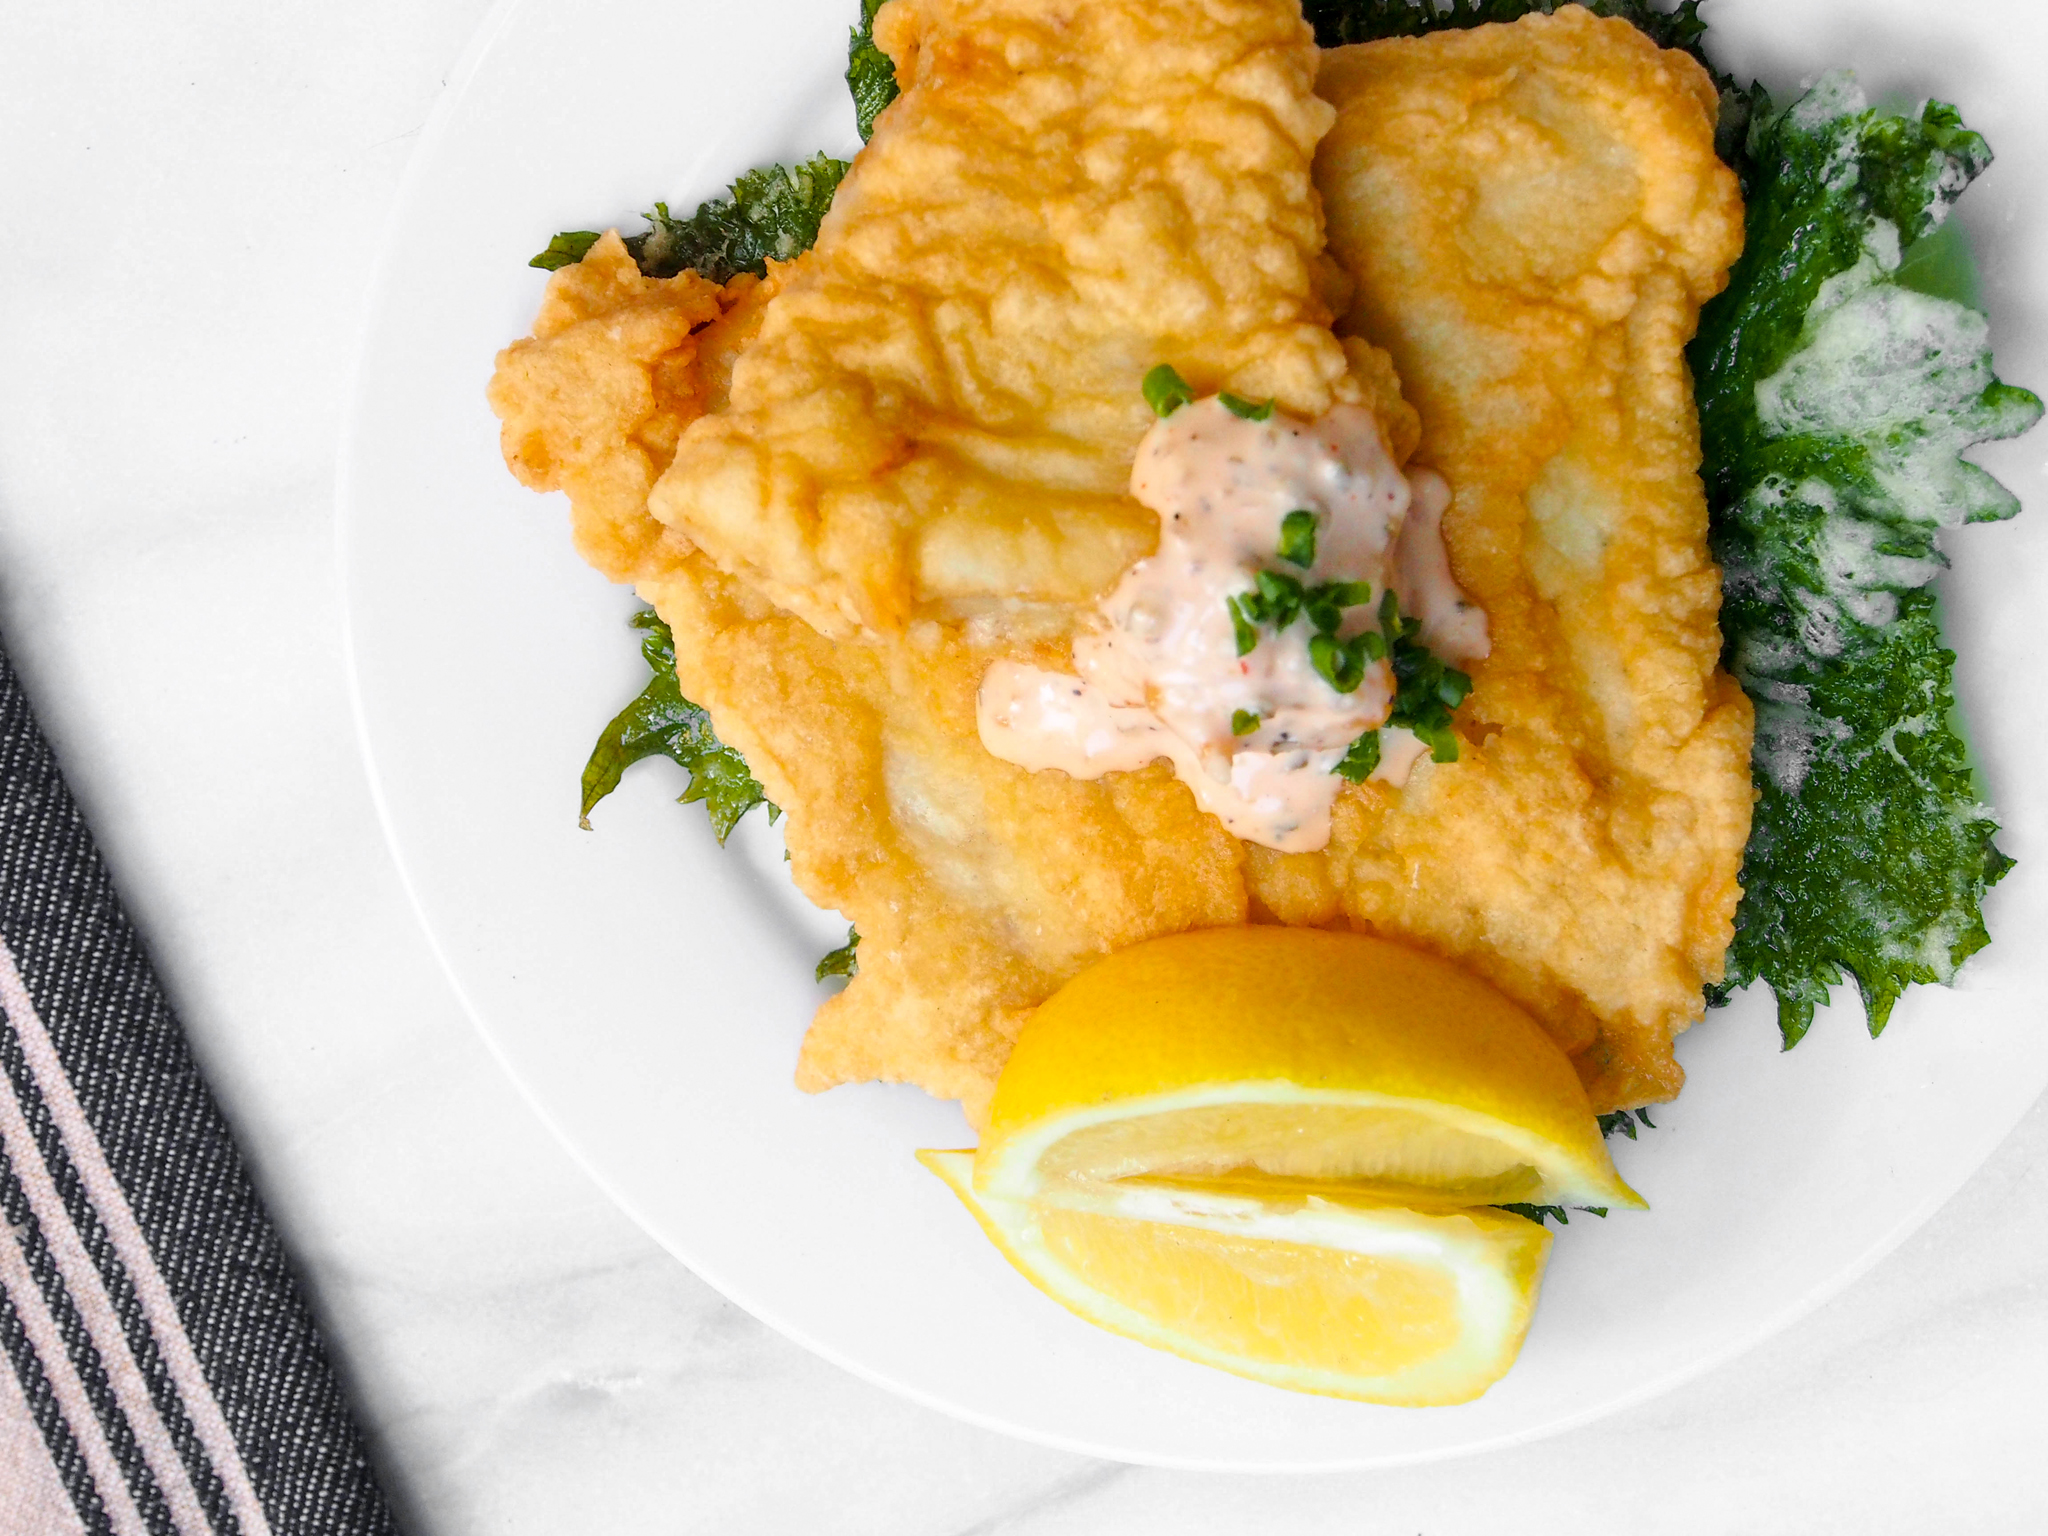
Slice tomatoes about 1/4 inch thick, season with salt and pepper and set aside. Combine batter then coat tomatoes on both sides. In a large skillet, heat enough bacon drippings to coat the bottom of the pan and fry tomatoes until lightly browned on both sides. (2-3 min per side) If oil sizzles or pops before you put the tomatoes in, it's too hot! Transfer to a colander or wire cooling rack to drain. To keep the tomatoes from getting soggy before they're served, the best way is to stand them up like wheels in a serving dish instead of stacking them. To make the sauce, add coconut oil in a saucepan until melted over medium heat. Whisk in flour, then milk & buttermilk until mixture is thickened and bubbly. Garnish with fresh dill, cucumber carrot kimchi & red pepper flakes. Serve immediately and enjoy! (You'll think you died and gone to heaven!)

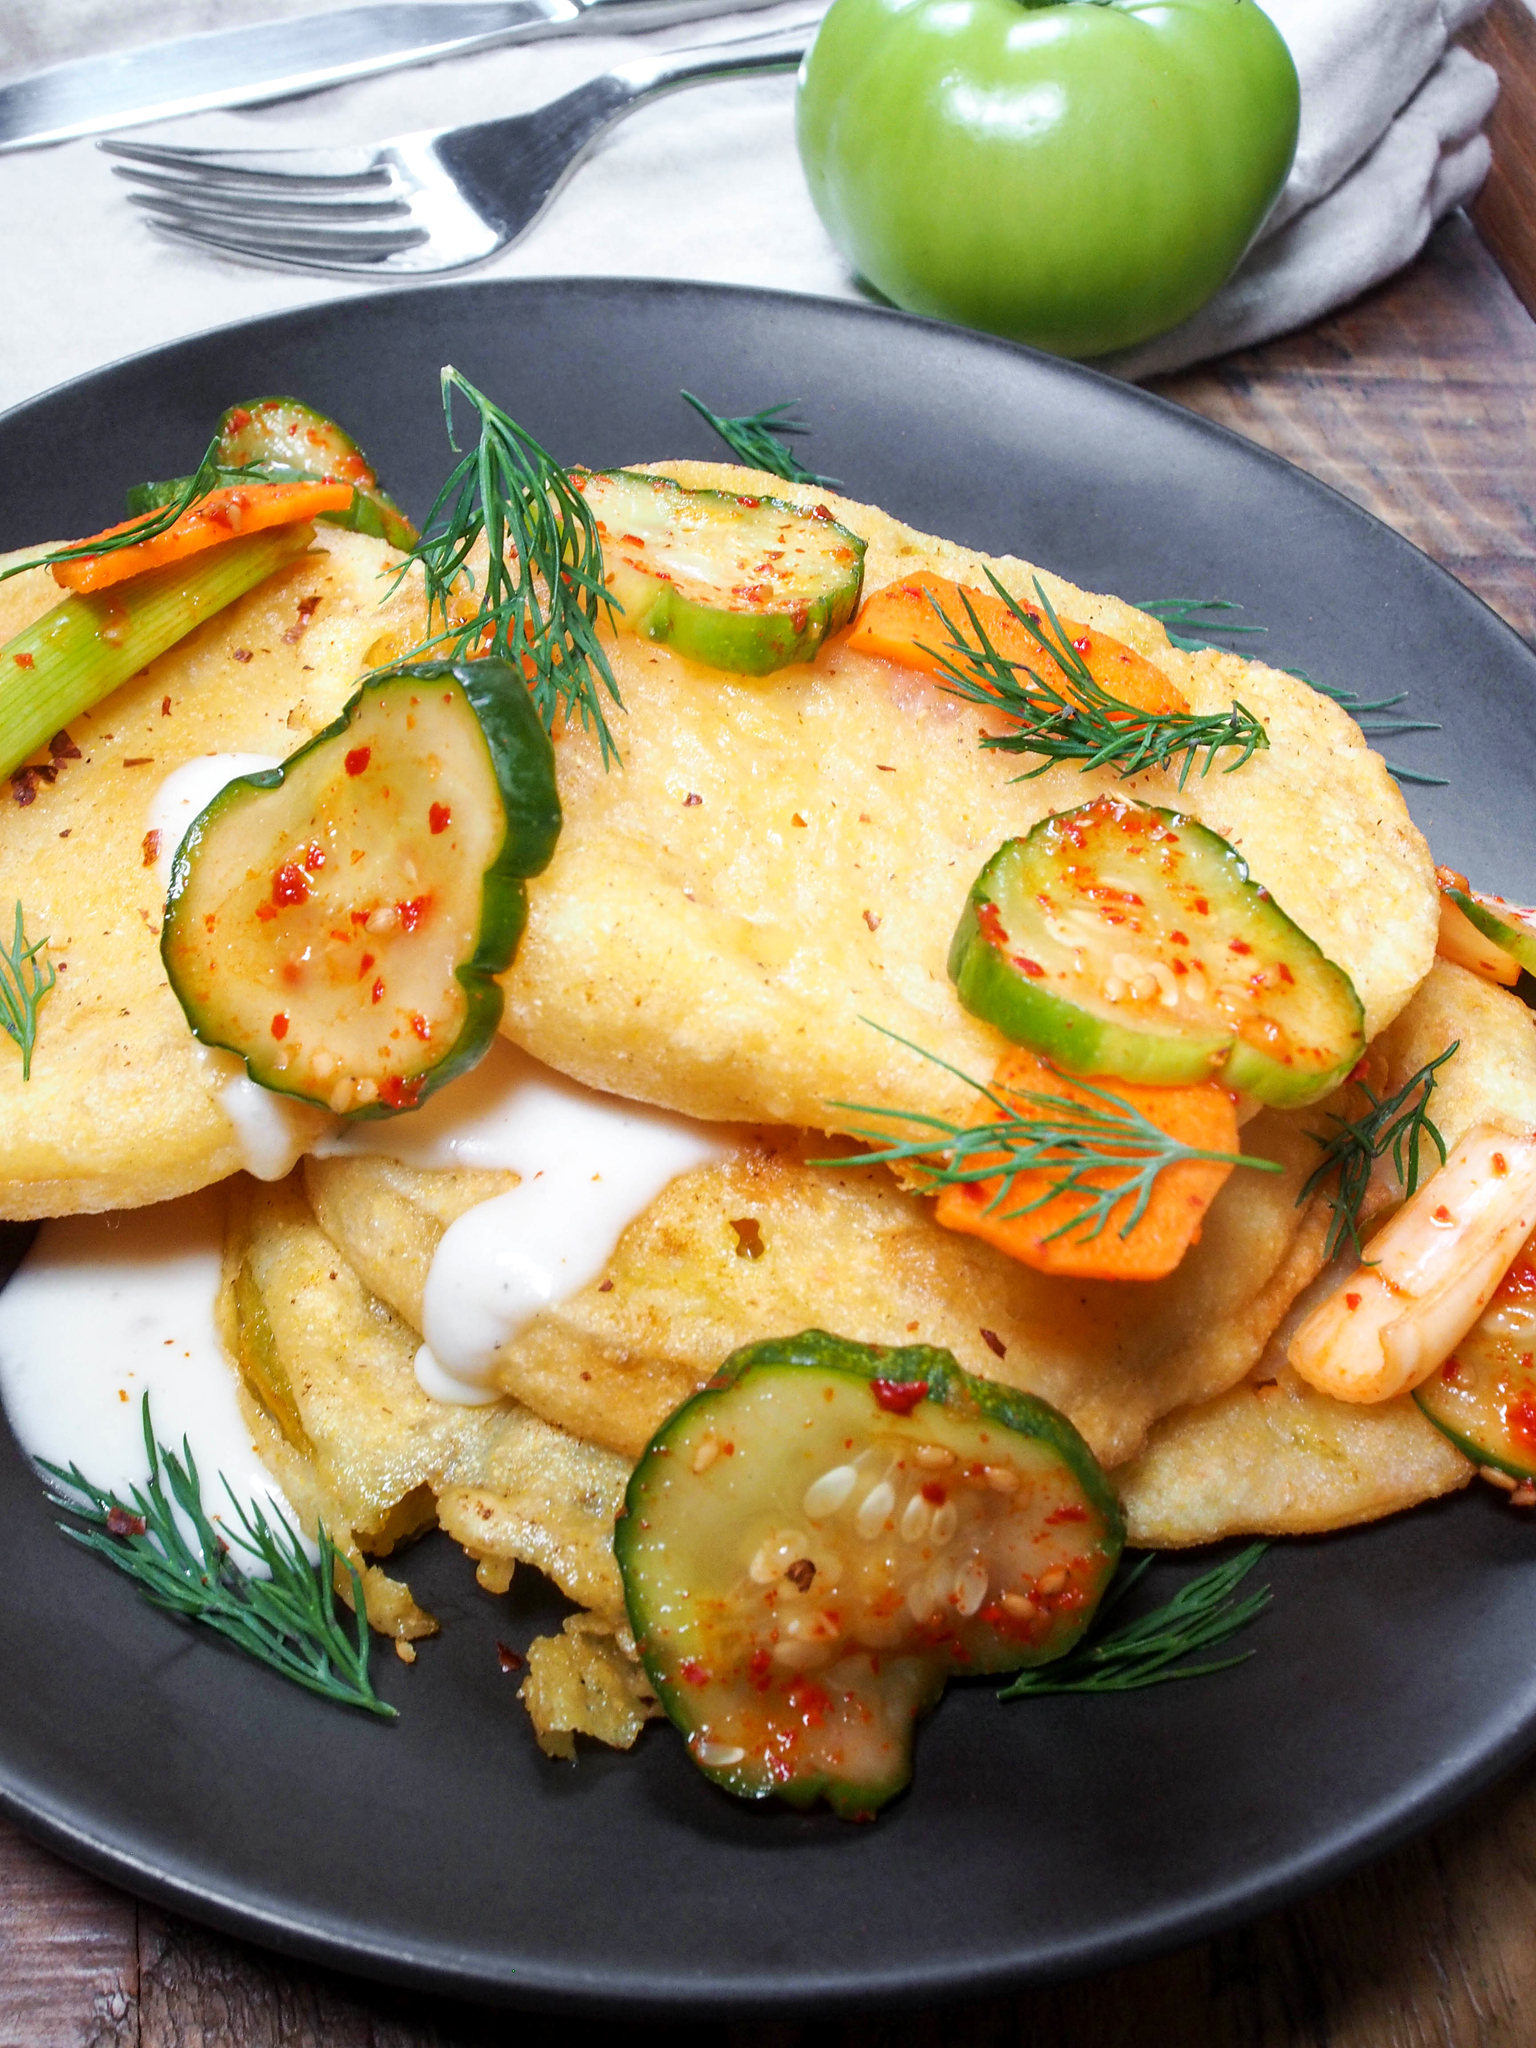
They came out crisp and golden, a wonderful juxtaposition to the tart and juicy tomato. Added components to the dish were fresh dill, cucumber carrot kimchi, and red pepper flakes. I chose these ingredients because I felt it overall completed the entire dish. The combination of flavors was explosive to my palette! You got the acidity from the tomato (By the way, do you consider it to be a vegetable or a fruit?), the slight smoky bacon flavor, the refreshing balance from the dill, and the spiciness from the kimchi and flakes.

Lastly, the buttermilk sauce is creamy and tangy. The final finishing touch. I've been working on my style and plating, what do y'all think? How do you make fried green tomatoes? Perhaps next time, you'll give this recipe a try? It's great as an appetizer or for lunch. Or if you're just very, very, hungry. 😉 Until next time, feel free to comment down below and subscribe (to the right, in the side bar). Have a nice weekend!

LOVE & XX'S,

FOLLOW MAQ + SUZ

In 2016, Appetizer, Appetizer Recipe, April 2016, Blogger, Blogging, Carrots, Cooking, Food, Food Blog, Food Photographer, Food Photography, Food Porn, Foodie, Friday, Hors d'oeuvre, Kimchi, Korean, Korean Cuisine, Korean Food, Korean Recipe, Lifestyle, NYC Photographer, Photographer, Quick and Easy Recipes, Recipe, Recipes, Trending, Fried Green Tomatoes, Korean Fusion Tags Fried Green Tomatoes, Green Tomatoes, Fried, Tomatoes, Cucumber, Kimchi, Carrots, Dill, Buttermilk, Buttermilk Sauce, Korean Fusion, Recipe, Recipes, Appetizer, Appetizer Recipe, Hors d'oeuvre, I Love to Cook, Food Photographer, Food Photography, Lunch Recipe, Fried Appetizer, Korean Recipe, Cooking, Home Cooking, Lifestyle, Food Blogger, Food Blogging, Foodie, Food Addict, Suz's Recipe, Food Blog, Food Porn, Food Lovers, Food Lover, Tomato, Green Tomato, Delicious, Yummy
42 Comments

Fish n Perilla Chips with Kimchi Tartar Sauce

April 20, 2016

This past winter I had the delightful pleasure of trying, for the very first time, fried bay leaves with a Crema Catalana from Casa Mono, a chic yet quaint little restaurant in Union Square. Ever since then, I've been looking to cook something similar but not as strong in taste. The bay leaves were the perfect balance to the rich and creamy burnt vanilla custard, but I wanted to create something more on the savory side.

DOWNLOAD RECIPE

Fish n Perilla Chips with Kimchi Tartar Sauce

Serves 2

Photos and recipe: © Suzanne Spiegoski

Photos and recipe: © Suzanne Spiegoski

Ingredients:

4 pieces large white fish fillets (I used cod for this recipe)
12 pieces perilla leaves
1/2 tsp of salt and ground black pepper
1 cup flour + 1 beaten egg (for fish only)
1 cup flour (for dusting fish)
1/2 cup beer of choice
1/4 cup flour + 1/4 cornstarch + cold water (for perilla leaves)
canola oil for frying
2 tsp kimchi juice
tartar sauce
lemon wedges

Directions:

  1. Make sure the fish fillets are pat dry before use. Either pre-rub the fillets with salt and ground pepper OR add the salt and pepper to the flour before dusting.
  2. Whisk the flour, beer, and egg until a thick consistency is reached. Thicker batter = thicker crust. Adjust the batter according to preference. Dust each fish fillet in the flour first, then dip into the batter and allow any excess to drip off.
  3. Heat oil in a cast-iron pot or frying pan on medium-high heat (or approx. 350ºF). Once heated, carefully lower the fish into the oil one by one to avoid any oil from splashing. If completely submerged, fry about 6 minutes total or until batter is golden and crisp. Remove fish to wiring rack or set on paper towels to soak up extra oil.
  4. Whisk the flour, cornstarch, and water in another shallow bowl. The batter will be very thin and slurry-like. Coat individual perilla leaves, front, and back, with a brush until fully coated. Fry in remaining oil for about 10~15 seconds or until batter crisps. Set aside to cool.
  5. Serve hot with tartar sauce (don't forget to mix in the kimchi juice!) and lemon wedges.

When I discovered My Korean Eats, a terrific Korean fusion food blog, they created a fish n chips dish, where the chips are fried perilla leaves. Though my recipe is heavily influenced from theirs, I incorporated my own little twist on it! The finishing touch and one of the most important, in my opinion, when it comes to a dish. I mixed in some kimchi juice with the Tartar sauce! Shazam!

What I couldn't get enough of were those fried perilla leaves! They're crispy, fresh and slightly decadent. I grew up on these leaves, usually in a form of banchan; marinated in a spicy red pepper sauce similar to kimchi. And these are a wonderful substitute to the non-healthy carb-loading fries or potato chips! Perilla leaves are sharp in flavor, with a unique shape and vibrant green color. 

Of course, you can't have fish n chips without some lemon wedges! The last piece of garnish were some finely chopped up scallions. It's optional, you could go for some chives or parsley, depending on what you like and perhaps, what's in the fridge. But I think the garnish, brings out more of the combined flavors of the Tartar sauce and kimchi juice. I'm not going to lie, I may have or may not have dipped the leaves into the sauce to try and WOW! So freaking delicious.

Coming up on the blog, a full new look/editorial series and some new summery cocktails/drinks I've been researching like a mad scientist! Who would've guessed I'd enjoy mixology so much?! I've bartended here and there when I first moved to the city, but I was never officially a mixologist, ha ha! Want to recommend/suggest something for me to cook/make? Leave your comments at the end of this post and don't forget to subscribe to keep up with all of our newest food & recipes! Have a great rest of your Hump Day, friends! 💛💛💛

LOVE & XX'S

FOLLOW MAQ + SUZ

Source: http://www.suzannespiegoski.com/maq-and-su...
In 2016, Blogger, Blogging, Cooking, Dinner, Dinner Recipe, Food, Food Blog, Food Photographer, Food Photography, Food Porn, Foodie, Kimchi, Korean, Korean Cuisine, Korean Food, Korean Fusion, Korean Recipe, Lifestyle, NYC Photographer, Photographer, Photography, Quick and Easy Recipes, Recipe, Recipes, Fish Recipe, Seafood, Fish n Chips, Perilla Leaves, Kimchi Tartar Sauce Tags Fish n Chips, Perilla Leaves, Korean Fusion, Fish Recipe, Recipe, Fish, White Fish, Fish Fillets, Cod, Fried, Fried Foods, Seafood, Seafood Recipe, Food Photographer, Food Photography, Food, Food Blog, Food Blogging, Food Blogger, Blogger, I Love to Cook, Cooking, Home Cooking, Frying, Fried Perilla Leaves, Korean Recipe, Fusion Food, Food Lovers, Food Porn, Foodie, Food Addict, EEEEEATS, Flavorful, Kimchi, Tartar Sauce, Fish and Chips, Recipes, Dinner Recipes, Lunch Recipe, Yummy, Delicious, Seasoning, April
60 Comments

The KimKraut Dog

April 11, 2016

Happy Monday! Not a fan of today? I've created a new Korean-fusion inspired recipe to zap those Monday Blues away! Inspired by both my Asian and Eastern European heritage, I wanted to combine the two worlds in a dish, but also something that would be simple and easy to make for a manic Monday. 

Okay, so by now you're wondering, what is KimKraut? I've seen many and have tried a variety of Korean hot dogs. Some even have added bulgogi on top of the hot dog, some more kimchi-oriented. And some more Americanized. I wanted to make something a little different; something that resonates with who I am. So, I decided to mix kimchi and sauerkraut together and BAM! There you have it, folks! KimKraut! I used cabbage kimchi to keep the vegetables consistent together, though, I'd be down with trying other forms of kimchi, such as cucumber or radish.

DOWNLOAD RECIPE

The KimKraut Dog


Ingredients:

Recipe + photos by: © Suzanne Spiegoski

Recipe + photos by: © Suzanne Spiegoski

4 bratwurst sausages, grilled
4 hot dog buns, toasted
4 tsp mustard
2 tsp soy sauce
1 tsp sugar
1 tsp white vinegar
1/4 tsp salt
4 tsp ketchup
1 tsp sriracha sauce
1/2 cup chopped kimchi (cabbage)
1/2 cup chopped sauerkraut
2 tsp rice vinegar
2 tsp honey
2 green onion, chopped
black sesame seeds, for garnish

Directions:

  1. Mix mustard, soy sauce, sugar, white vinegar and salt in a small bowl. Set aside.
  2. Mix ketchup and sriracha sauce in another small bowl. Set aside.
  3. Combine kimchi, sauerkraut, rice vinegar, and honey in a small bowl to create KimKraut. Set aside.
  4. Grill bratwursts. Toast buns at 350°F for 5-7 minutes.
  5. Prepare hot dog with sausage, KimKraut, mustard and ketchup sauces, chopped green onion and black sesame seeds.
  6. Enjoy!

When I had first met my husband and sheepishly confessed that I could cook, he wittingly replied, "Sure, you can. What can you make, just kimchi & kielbasa?" Boy, was he mistaken! He's now my #1 guinea pig. And happily so! I adore cooking for the people I love and I also love sharing stories, especially anything involved with food and cooking! (And maybe my husband.. ha, ha!) This recipe was definitely inspired by my hubby's sense of humor. And yes, kimchi paired with any kind of sausage is absolutely delicious!

I didn't want to Americanize the dish by squeezing regular mustard and ketchup sauce on the hot dogs. Since the dogs are meant to be Korean-fusion based, I also kept the flavors in the sauce. I mixed regular French's mustard with a tiny bit of soy sauce, sugar, white vinegar and a pinch of salt. The ketchup was combined with some sriracha sauce, to add an extra touch of heat in with the kimchi spices. These sauces really gave every single bite packed with tangy and meaty flavor! Lastly, I garnished with chopped green onion and black sesame seeds. Coming up next on the blog? A whole new lookbook series with another style video! Check out my Instagram for a teaser. Stay tuned...

LOVE & XX'S,

FOLLOW MAQ + SUZ

Source: http://www.suzannespiegoski.com/maq-and-su...
In 2016, April 2016, Blogger, Blogging, Cooking, Dinner, Dinner Recipe, Food, Food Blog, Food Photographer, Food Photography, Food Porn, Foodie, Kimchi, Korean, Korean Cuisine, Korean Food, Korean Fusion, Korean Recipe, Lifestyle, Monday, NYC Photographer, Recipe, Recipes, Quick and Easy Recipes, Sesame, Spicy, Hot Dogs, Korean Hot Dogs Tags Korean Fusion, Kimchi, Korean Food, Korean Recipe, Korean, Korean Hot Dogs, Hot Dogs, KimKraut, The KimKraut Dog, Hot Dog, Bratwurst, Bratwursts, Sesame Seeds, Sauerkraut, Food, Food Lover, Food Lovers, I Love to Cook, Food Photographer, Food Photography, Food Porn, Foodie, Food Bae, Asian, Eurasian, Buns, Recipe, Recipes, Food Recipe, Food Recipes, Cooking, Home Cooking, Dinner, Dinner Recipe, Dinner Recipes, Lunch, Lunch Recipe, Monday, Monday Blues, Monday Meal, Meal, Yummy, Delicious, Food Addict
34 Comments
Korean-Style Pork Belly Nachos. All photos by © Suzanne Spiegoski

Korean-Style Pork Belly Nachos. All photos by © Suzanne Spiegoski

Korean-Style Pork Belly Nachos

February 5, 2016

Well, that title was a mouthful. And deservingly so! I came across this recipe while looking for a smacking good-ass recipe for the Super Bowl on Sunday. Initially I was going to cook kalbi (galbi) but I wanted to infuse a classic American football munchie snack into something partly Korean. That's where I ran into this article on Buzzfeed and DUDE. It. Is. Splendidly. Delish! The flavors are insane! I can assure you, anyone to scarf down on these bad boys will be your new best friends as you've made their life complete. An instant touchdown! Did I mention it's in a cast-iron skillet? The Lodge cast iron is one of my favorite pans to cook in.

download recipe

Korean-Style Pork Belly Nachos

Serves 4-6

Korean-Style Pork Belly Nachos

Korean-Style Pork Belly Nachos

Ingredients:

  • 1 lb of pork belly, sliced
  • 2 garlic cloves, minced
  • 2 Tbsp. soy sauce
  • 2 Tbsp. red pepper powder
  • 1 Tbsp. honey
  • ⅓ cup + ¼ cup kimchi juice
  • Tortilla chips
  • Cheddar
  • Monterey Jack
  • Chopped kimchee
  • Red onions
  • Tomatoes
  • Scallions
  • ⅓ cup sour cream

Directions:

Combine pork belly slices with garlic, soy sauce, red pepper powder, honey, and ⅓ cup kimchi juice. Mix until the pork belly is coated in red. Pan-fry pork belly until fat has rendered and crispy.

Assemble your nachos. In a skillet, lay down a layer of tortilla chips, sprinkle on the cheeses, add chopped kimchi, toss on the cooked pork belly, top with some chopped red onions. Repeat.

Melt the cheeses under the broiler until crispy and bubbly. Mix together the sour cream and remaining ¼ cup kimchi juice and drizzle on top of the nachos.

K-Style pork belly nachos: Get. In. My. Belly. STAT!

K-Style pork belly nachos: Get. In. My. Belly. STAT!

These are the prettiest nachos I've ever made!

These are the prettiest nachos I've ever made!

If you're a fan of pork belly like myself, make sure to get the meat nice and crispy. There's nothing sadder than soggy pork belly! The trick is not to cook the entire pound of meat all at once. Divide the meat into smaller portions when cooking it, that way giving the marinade and pork belly enough room to be cooked properly. I cooked mine just a knob above medium heat, because I like it really crispy. :)

And that sour cream kimchi sauce is OUT. OF. THIS. WORLD. I swear I could put this sauce on anything and it'd taste superb! That's like a fried foodie junkie saying, "I love anything fried. You could fry carpet and I'd eat it." Ha ha ha! But seriously, the combination of the dairy with the tangy juice from the kimchi is excellent and just the perfect complement to this dish. Are you ready for some football?!

What's everyone making this Sunday? Are you a football lover? I'm not really into the game itself, but I adore the ads/commercials and the live performances during halftime. I'm actually really excited to see Coldplay play as this will be their first appearance at a Super Bowl. Plus, Beyonce and Bruno Mars will also be performing, so I've got a pretty good feeling that this halftime show will be awesome! Who are you excited to see perform?

I'm such a girl that I didn't even know who was playing in the Super Bowl until just now when I looked it up! :X In which case, whichever team you are rooting for, whether it's the Panthers or Broncos, have fun, be safe and let the good times roll! Hope y'all have a very nice and cozy weekend. 🏈❤️🏈❤️🏈

Love & xx's,

Source: http://www.buzzfeed.com/emilyhorng/stop-wh...
In 2016, Appetizer, Appetizer Recipe, Blogger, Blogging, Cooking, February 2016, Food, Food Blog, Food Photographer, Food Photography, Food Porn, Foodie, Friday, Korean, Korean Cuisine, Korean Food, Korean Recipe, Lifestyle, NYC Photographer, Photographer, Quick and Easy Recipes, Recipe, Recipes, Snack, TGIF, Trending, Pork Belly, Korean Nachos, Nachos, Super Bowl 2016, Super Bowl Food, Super Bowl Party Snack Tags Korean Food, Korean Nachos, Nachos, Super Bowl Food, Snack, Pork Belly, Pork, Korean Recipe, Korean Cuisine, Food, Food Blog, Super Bowl 2016, Super Bowl, Football, Food Photography, Foodie, Food Porn, Food Lover, Food Recipe, Appetizer, I Love to Cook, Cooking, Home Cooking, Food Blogger, Food Blogging, Super Bowl Party Food
12 Comments
Daktoritang 닭도리탕 (Korean Spicy Chicken Stew) Photos © Suzanne Spiegoski

Daktoritang 닭도리탕 (Korean Spicy Chicken Stew) Photos © Suzanne Spiegoski

Daktoritang (Korean Spicy Chicken Stew)

January 29, 2016

During the winter season, I love a warm, hearty bowl of comfort food. My girlfriend has been asking for my recipe of daktoritang, a Korean spicy chicken stew and ever since we chatted about it, I've been craving for it like mad! It's a quick and easy recipe, one of those 'throw it all in a pot' and 'sit back and relax' type of meals. Takes only about an hour total to make! Such a yummy dinner for any night of the week.

Perfect for any chicken lover, you can adjust the spiciness according to your taste.

Perfect for any chicken lover, you can adjust the spiciness according to your taste.

download recipe

Daktoritang 닭도리탕 (Korean Spicy Chicken Stew)

Serves 4-6

Ingredients

A hearty Korean chicken stew with rice.

A hearty Korean chicken stew with rice.

Sushi rice

2 ½ pounds chicken thighs

2 large potatoes, cut into large chunks

2 carrots, chopped into ½ inch pieces

1 large onion, cut into 8 chunks

4 cloves garlic, crushed

¼ cup water

½ cup soy sauce

 2 tbsp white sugar

3-4 generous tbsp gochujang/Korean hot pepper paste

(adjust based on how spicy you want it!)

Directions

1.       Mix chicken, potatoes, carrots, onion and garlic in a large pot over medium heat

2.       Pour in water and soy sauce

3.       Mix in sugar and pepper paste and bring to a boil

4.       Reduce to low and simmer covered, for 45 minutes until chicken is cooked through and veggies are tender.

5.       Serve with sushi rice.

Close-up of daktoritang, a Korean Spicy Chicken Stew I made for tonight. Delicious!

Close-up of daktoritang, a Korean Spicy Chicken Stew I made for tonight. Delicious!

Cooked in gochujang (a Korean fermented red chili paste) along with vegetables such as potatoes, carrots, and onions, it's a real hit for spicy lovers but what I love about this dish is the ability to be able to alter the hotness of the sauce. Growing up I remember seeing four different pots over the stove, straight up from Goldilocks, when my mother made this. One was extra spicy, one was regularly spiced, the third was mildly spiced, and the littlest pot was for, well, you know how the rest of this goes...

Anyone hungry? Winner-winner, chicken dinner! Don't forget to download the recipe above!

Anyone hungry? Winner-winner, chicken dinner! Don't forget to download the recipe above!

I love it spicy so I usually put in 4 heaping spoonfuls of gochujang in, however, if you would like it on the milder side, I'd recommend a generous 2 tablespoons for it. As for the chicken, you can use any part of the meat, just as long as it's close to 2.5 pounds. I really like chicken thighs, so I used boneless ones for this recipe.

Chicken stew, where are you? You're about to get in my belly, that's where! ;)

Chicken stew, where are you? You're about to get in my belly, that's where! ;)

You can get gochujang at any Asian market. They're also available online at Amazon and other similar places. If you have more questions about this stew, please comment below. I am always happy to hear and answer questions from my readers. You guys rock! TGIF and hope everyone has a nice weekend! Have a good one. :)

Daktoritang 닭도리탕 (Korean Spicy Chicken Stew) Photos © Suzanne Spiegoski

Daktoritang 닭도리탕 (Korean Spicy Chicken Stew) Photos © Suzanne Spiegoski

Love & xx's

In 2016, Blogger, Blogging, Cooking, Dinner, Dinner Recipe, Food, Food Blog, Food Photographer, Food Photography, Food Porn, Foodie, Friday, January 2016, Korean, Korean Cuisine, Korean Food, Korean Recipe, Lifestyle, Quick and Easy Recipes, Recipe, Recipes, Rice, Stew, Winter, Spicy, Chicken Recipe Tags Korean Food, Korean Spicy Chicken Stew, Chicken, Spicy, Korean Cuisine, Food Photography, Korean Recipe, Korean, Foodie, Food Porn, I Love to Cook, Cooking, Home Cooking, Chicken Stew, Stew, Stew Recipe, Food Blog, Food Blogger, Food Blogging, Dinner, Dinner Recipe, Dakdoritang, 닭도리탕
6 Comments
← Newer Posts Older Posts →

MaQ + Suz

MaQ + Suz is a New York City-based digital creative studio specializing in brand image and content photography for beauty, fashion & lifestyle brands.

For inquiries, please email: suzanne.spiegoski@gmail.com

Archive
  • May 2025
  • February 2025
  • January 2025
  • October 2024
  • May 2024
  • April 2024
  • February 2024
  • August 2023
  • October 2022
  • August 2022
  • May 2022
  • December 2021
  • November 2021
  • July 2021
  • January 2021
  • November 2020
  • October 2020
  • September 2020
  • August 2020
  • July 2020
  • June 2020
  • May 2020
  • March 2020
  • January 2020
  • November 2019
  • October 2019
  • September 2019
  • August 2019
  • July 2019
  • June 2019
  • May 2019
  • April 2019
  • March 2019
  • February 2019
  • January 2019
  • December 2018
  • November 2018
  • October 2018
  • September 2018
  • August 2018
  • July 2018
  • June 2018
  • May 2018
  • April 2018
  • March 2018
  • February 2018
  • January 2018
  • December 2017
  • November 2017
  • October 2017
  • September 2017
  • August 2017
  • July 2017
  • June 2017
  • May 2017
  • April 2017
  • March 2017
  • February 2017
  • January 2017
  • December 2016
  • November 2016
  • October 2016
  • September 2016
  • August 2016
  • July 2016
  • June 2016
  • May 2016
  • April 2016
  • March 2016
  • February 2016
  • January 2016
  • December 2015
  • November 2015
  • October 2015
  • September 2015
  • August 2015
  • March 2015
  • January 2015
  • August 2014
  • April 2014
  • February 2014
  • December 2013
  • November 2013
  • October 2013
  • January 2013
  • December 2012
  • May 2012
  • April 2012
  • March 2012
  • July 2011
  • October 2010
  • August 2010
  • June 2010

most recent blog posts

Featured
5 Chic Spring Outfits
May 6, 2025
5 Chic Spring Outfits
May 6, 2025
Read More →
May 6, 2025
How To Wear Navy Blue and Black Together Like A Parisian
Feb 24, 2025
How To Wear Navy Blue and Black Together Like A Parisian
Feb 24, 2025
Read More →
Feb 24, 2025
Elevated LBD Date Night Outfits
Jan 23, 2025
Elevated LBD Date Night Outfits
Jan 23, 2025
Read More →
Jan 23, 2025
5 Warm & Cozy Chic Winter Styles to Keep You Comfortable
Jan 14, 2025
5 Warm & Cozy Chic Winter Styles to Keep You Comfortable
Jan 14, 2025
Read More →
Jan 14, 2025
Mermaid Holiday Look
Oct 30, 2024
Mermaid Holiday Look
Oct 30, 2024
Read More →
Oct 30, 2024
Burgundy is Taking Over: How to Style the Color of the Season
Oct 18, 2024
Burgundy is Taking Over: How to Style the Color of the Season
Oct 18, 2024
Read More →
Oct 18, 2024
5 Summer Looks
May 29, 2024
5 Summer Looks
May 29, 2024
Read More →
May 29, 2024
Lunya, My Favorite Pajamas Ever
May 25, 2024
Lunya, My Favorite Pajamas Ever
May 25, 2024
Read More →
May 25, 2024
Summery Kimchi Fusion Recipes
May 22, 2024
Summery Kimchi Fusion Recipes
May 22, 2024
Read More →
May 22, 2024
Wedding Guest Dresses
May 17, 2024
Wedding Guest Dresses
May 17, 2024
Read More →
May 17, 2024

Subscribe

Sign up with your email address to receive news and updates.

We respect your privacy.

Thank you!

FOLLOW ON INSTAGRAM!

@suzannespiegoski

Neutrals 🧁🍨🍦

Dress: @jjshouseofficial 
[code suzanne1404 for 10% off]

Shoes: @inez 👡
[code Suz15Spring25 for 15% off]

#jjshouse #madebyjjs #outfitinspo #outfitinspiration  #neutralstyle #neutraldress
Lace with texture @nicolemillernyc 🤍

The nicole by Nicole Miller is exclusively at @QVC, and I love these versatile pieces suited for so many occasions! For the office or weekend events, trade bulky layers for the breezy bliss of the
In between ☀️ + ☔️ 

Outfit details on my @shop.Itk page and here: https://liketk.it/5d6HB

#springfashion #transitionaloutfit #miniskirt #loafers #blackbag
In full bloom 🌸🤍 @commense.official

More details on this dress on my @shop.Itk page and here: https://liketk.it/5cojh

#whitedress #lacedress #springfashion #ltkunder100 #whitelacedress
💜🍇🍷

Shop this purple/burgundy outfit on my @shop.Itk page and here: https://liketk.it/5bVhv

#streetstyle #purpleoutfit #springfashion #monochromeoutfit #ltkworkwear #ltkunder100
The Fisherman's Lily Paperback - January 26, 2015
By Suzanne Spiegoski
Buy on Amazon

FOLLOW ON LIKEtoKNOW.it

Neutrals 🧁🍨🍦

Dress: @jjshouseofficial 
[code suzanne1404 for 10% off]

Shoes: @inez 👡
[code Suz15Spring25 for 15% off]

#jjshouse #madebyjjs #outfitinspo #outfitinspiration  #neutralstyle #neutraldress
Lace with texture @nicolemillernyc 🤍

The nicole by Nicole Miller is exclusively at @QVC, and I love these versatile pieces suited for so many occasions! For the office or weekend events, trade bulky layers for the breezy bliss of the
In between ☀️ + ☔️ 

Outfit details on my @shop.Itk page and here: https://liketk.it/5d6HB

#springfashion #transitionaloutfit #miniskirt #loafers #blackbag
In full bloom 🌸🤍 @commense.official

More details on this dress on my @shop.Itk page and here: https://liketk.it/5cojh

#whitedress #lacedress #springfashion #ltkunder100 #whitelacedress

About Me - contact