Apple Pie From Scratch

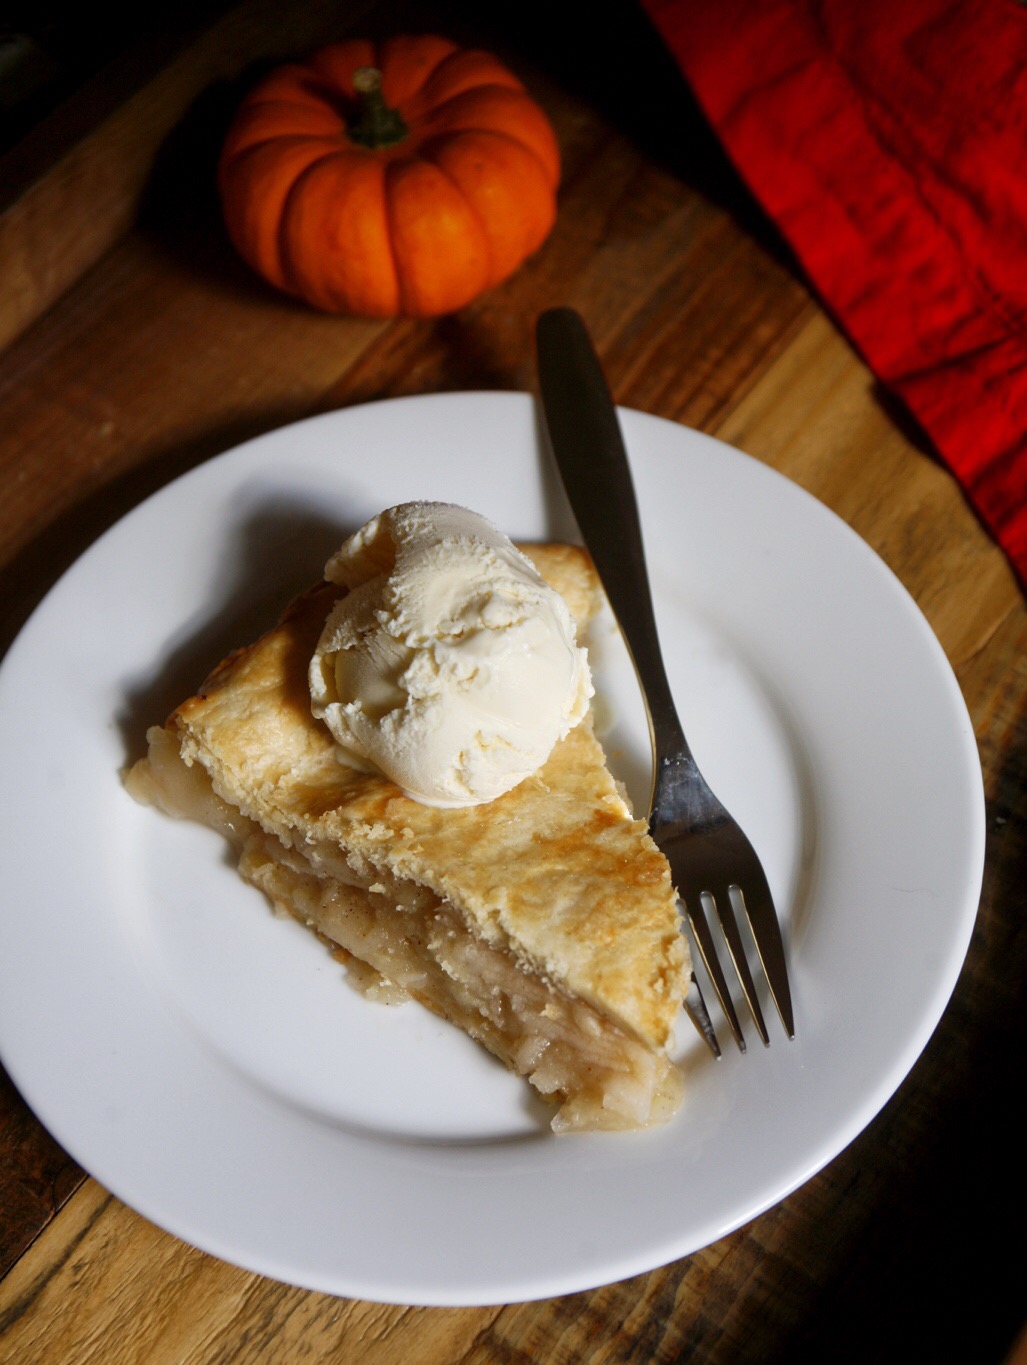
Okay, don't be too jealous, but for today's lunch, I baked (then obviously ate) a homemade apple pie! Well, not to its entirety! But I did enjoy it with a generous scoop of vanilla ice cream. ;)

It's one of my staple desserts for Fall. And because I am trying to hone in my skills as a baker, I was determined to make this apple pie the best apple pie I've made to date! My weakness has never ever been with the filling. This I can do in my sleep. I have the most difficulty with the pie dough, and making it from scratch does have its challenges. But, just like any other form of discipline, the more you go at it, the better it's going to be every time! I think it goes without saying, I'm pretty happy with the way this pie turned out today! Baking ninja skills successfully improved!  I even gave myself a gold star! Ha ha ha! Kidding.

Does this pie look gorgeous or what?! I baked this bad boy to near perfection! I'm seriously giving myself a good ole' pat on the back because this is the finest pie I've ever made. I can't wait to stuff my hubby with it tonight after dinner!

print recipe

The Best Apple Pie

Yield: 8-10 servings

A simple and delicious recipe for "the best apple pie" -- made almost entirely with a food processor! Recipe from Gimme Some Oven

Prep: 25 mins Cook: 1 hour Total: 1 hour 25 mins

Ingredients:

    1 double-crust pie dough, refrigerated (*see below for recipe*)

    2 tablespoons all-purpose flour, plus more for dusting the workspace

    3/4 cup sugar, plus extra for dusting the top of the crust

    1/2 teaspoon ground cinnamon

    1/4 teaspoon ground nutmeg

    1/4 teaspoon salt

    1/8 teaspoon allspice

    3 large Granny Smith apples (about 1.5 pounds), cored and peeled

    4 large McIntosh apples (about 2 pounds), cored and peeled

    1 Tbsp. lemon juice

    1 large egg white, lightly beaten

    (optional) vanilla ice cream and whipped cream for serving


Directions:

Preheat oven to 375 degrees. Prepare a 9-inch pie plate with cooking spray.

Roll out the two pieces of dough on a floured workspace into large circles, until the larger one is at least 12-inches in diameter, and the smaller one is about 10-inches in diameter. Carefully transfer the larger pie dough to the pie plate by and press it in gently to line the entire bottom of the pan, with the dough sticking out at least 1/2-inch above the rim. Cover gently with plastic wrap and refrigerate.

While the dough is re-cooling, whisk together the sugar, cinnamon, salt and allspice in a large bowl until mixed. Set aside.

Fit your food processor with a slicing disc attachment, and thinly slice all of the apples. (You can also do this by hand with a knife.) Toss the apples with the lemon juice until evenly coated. Then transfer the apples to the large bowl with the flour mixture, and gently toss until all of the apples are fairly evenly coated with the flour mixture.

Turn the fruit mixture, including the juices, into the chilled pie shell and mound the apples slightly in the center. Carefully lay the second (10-inch) pie crust on top of the apples so that it is centered around the bottom crust. Trim the edges of the top and bottom crust to 1/2-inch beyond the pie pan lip. Then tuck the rim of dough underneath itself so that the folded edge is flush with the pan lip. Flute the edge or press with the tines of a fork to seal the pie crust. Cut 4 small slits in the top of the dough.

Return pie to the freezer for 10 minutes. Then remove and brush with the egg white, and sprinkle evenly with a few pinches of sugar. Cover the edges of the pie crust lightly with aluminum foil or a pie crust shield.

Bake for 40 minutes, then remove pie crust shield. Bake for an additional 20 minutes, or until the crust is a deep golden brown and the juices just barely start to seep out.

Transfer pie to a wire rack and let cool to room temperature before slicing, at least 3 hours.

*Here is my favorite all-butter DOUBLE pie crust recipe:

Ingredients:

    2 3/4 cups all-purpose flour

    1 tablespoon sugar

    1 teaspoon salt

    1 cup (2 sticks) cold butter, cut into 1/4-inch cubes

    1/2 cup COLD water


Instructions:

Add the flour, sugar and salt to a food processor. Pulse a few times until well-blended. Scatter in the butter, and pulse 7-8 times to cut in the butter well. Remove lid and fluff the mixture with a fork to be sure that it is not sticking to the sides or bottom of the food processor. Drizzle half of the water over the dry ingredients, then pulse another 5-6 times until crumbly. Fluff the pastry again with a fork, then sprinkle on the remaining water. Pulse 5-6 more times until the pastry starts to form small clumps and looks crumbly. (If the dough completely balls up and sticks together around the center blade, you have pulsed too far!)

Transfer the dough to a large bowl, and use your hands to pack it into a ball, just like you would a snowball. Separate the dough into two pieces, with one just slightly larger than the other (to make the bottom of the pie crust). Knead each ball of dough a few times, then flatten to make perfecly round disks about 3/4-inch in thickness. Wrap each disc in plastic wrap and refrigerate for at least an hour before rolling.

Growing up I mostly watched one of my Aunt's make pies. Baking did not exist in my mom's DNA. LOL! But I began to learn early on some tricks of the trade. But beware! Not all techniques work for everyone! That whole roll your dough out on the pie plate with the rolling pin? Never has done anything for me except having to start all over again because the dough broke. Two key tools I always recommend when it comes to pies is one, COLD ass water (put ice cubes in it to make it extra cold) when making the dough, and WAX PAPER.

I use the wax paper to better stabilize the dough when rolling it out and also when I put it in the pie plate. What about additional toppings? Are you an ice cream gal like me or do you love extras like whipped cream, extra cinnamon, etc?

The aroma is tortuous! Seriously, the smell is intoxicating! I am salivating as I type this! I have to go for seconds, forget about waiting for this pie to cool down! I'm going in...

What are your strategies/tips when it comes to baking pies? I'd love to hear from you!

Happy Monday!

Love & xx's,

maQ + suz

October Beauty Favorites

TGIF! October is officially here and there are a few beauty products that are my must-haves at the moment. And one of them, you will laugh at, but it's something I love to have from time to time! Don't judge me, I fully embrace myself just the way I am!

From left to right, clockwise.

  1. Formula X For Sephora Nail Polish in Ignite
  2. Fresh Sugar Cherry Tinted Lip Treatment - Sunscreen SPF 15
  3. Cartier Pasha Édition Noire Travel Rollerball Cologne
  4. Lancôme Hypnôse Doll Lashes Mascara
  5. L'Oreal Glam Bronze GG Cream
IMG_3755.JPG

I actually wore this Formula X nail polish the day I married my husband. We married in the Fall almost two years ago, and ever since, I have been constantly stocking on this particular deep red for the Autumn/Winter seasons here in New York. A definite must-have! They give my nails a modern, classic look and the rich hue complements my skin complexion very well, even when my summer tan is starting to taper off. ;)

IMG_3756.JPG

Okay, let me just say, I cannot get enough of Fresh's Sugar Lip Treatment! This season is the first time I'm trying an actual color from this line, and I went with 'Cherry' to go with my red nails. It provides 6 hours of moisture, leaving you with only soft, supple lips. Most women I know can rock full red lips, but I look like a blow fish if I go the scenic bright rouge route! I am loving it's subtle tint!

Normally I'd talk about my current perfume, but my current aromatic obsession is this new cologne by Cartier I got for my hubby. It's style is authentic and elegant (just like my man) with hints of mint, rose wood, coriander, mandarin, thyme and lavender. It's a very masculine perfume, and you cannot deny the expressions of virility and pure sophistication in it's scent. Perfect sexy vibes for Fall. I'd recommend it for any man who enjoys the finer and more beautiful things in life. And... (here's the laughable part), I like to spritz it on one of my hubby's shirts and wear it around the house sometimes, especially on rainy days like today! ❤︎❤︎❤︎

I've been using Lancôme's mascara for years. I sometimes use one from Kiehl's, but for everyday usage, this doll lash effect mascara gives a wide-eye look but also with perfect volumized, extended, luscious lashes. (Without looking like some cartoon character!) And the comb is really good in those hard-to-reach corners.

And now, last but not least, my favorite current bronze cream from L'Oreal. I love how weightless it feels and the coverage is very natural, giving my skin the perfect glow. It is a very sheer cream and has a very summery, floral scent to it. I love it! It doesn't give you much coverage, but I'd like to think of it as a lighter kind of contour for your face.

Thanks for stopping by! I hope you enjoyed some of my monthly beauty faves! Have a wonderful, super cozy weekend!

Love & xx's,

maQ + suz

PS The beauty products laid out on that super snugly faux fur blanket is from one of my all-time favorite stores, West Elm. :)

SHOP BEAUTY

Call Me Greta

NARS has done it once again! Last week on my OOTD post, I mentioned one of their lipsticks from the new Audacious Lipstick line I was wearing. I didn't put on as much on as I did today, given the pink hue is very rich, but for fun, I thought why not try putting it fully on instead of dabbing it on my lips like some little chicken. Live a little! Brighten up those lips for Fall! Am I right?!

Creamy, dramatic depth, and long-lasting, I had full coverage with one stroke! Super smooth and hydrating to my lips, I found this pigmentation to work fairly well with my complexion as well. I think I'm in love (swoon)!

The color is called Greta and has now become the name to my alter-ego lol! All kidding aside, do you think I could ever look like a Greta? When I think of a Greta, I think of a voluptuous Swedish blonde bombshell. Writers are weird. Nah, I wouldn't change my imagination for anything! Who do you picture in your mind when you think of the name, Greta?

I've been strangely told many times I look like a Samantha! I told 'em Sam might work, but I actually love my name. My father chose my name, but my closest friends call me Suz. My brother is the one who originated this nickname! It's crazy, but my mother wanted to name me either, Jennifer or Diana, but I'm glad my Dad came through with a more 'unique' name and how my mother loved it just as much when presented with the idea. ♥

I don't know about you, but I always love to hear the story behind a person's name. I like to know this part of their history because it somehow brings more character in a person, rather than just knowing a face. I like to think of it as kind of like a tiny piece of intimacy left behind, but not too much for it to be way too personal. To me, names are truly beautiful and should carry some sort of special message or meaning behind them.

What do you all think about Greta? Both the lipstick and the name? What's in a name to you?

Love & xx's,

maQ + suz

SHOP THE LIPSTICK

First Street Graffiti

This week's graffiti is at the First Street Green Art Park, filled with lots of new and colorful street murals. I wanted to first start with a photo of all the many faces of MaQ, in reference to the Global Freedom Exchange Mural behind him. This mural was created last week by 24 female activists from around the world. It was led by artist and activist Panmela Castro. The women had been on a two week mentoring program advocating the stop and prevention to all human trafficking where they met with government officials to "discuss best practices with NGO leaders, provide donors with knowledge about funding needs and the best mechanisms for support, and learn about collaborative approaches to working with local law enforcement." (firststreetgreenartpark.org) During this graffiti workshop, the group discussed the issue of trafficking and then picked up spray cans to express their conversation through the mural. Just like my pooch, there are 4 different faces and I only took a photo with one of the faces to demonstrate this symbolism, as the message is clear: Hope. Change. Love. Justice. And that one voice mantra. We all have it, and we all should be allowed to use it when we feel necessary. And with that one voice, this is where we can get the change, the hope, the love, and the justice we all humanly deserve.

Look at my fur baby! I love this shot of him because not only does he look handsome (of course, he always does), but because his head stands for the letter, 'L', in 'LOVE', becoming a part of the mural. What a lover boy. I never get sick of photographing him. I mean, can you blame me? ;)

A little farther down into this area, we stumbled upon this amazing peacock! This art piece is by D. Gale. partnered with the Centre Fuge Public Art Project. I don't think I have ever seen a graffiti peacock since I've been in New York. This one is so spectacular, you have to see it for yourself! Don't they both look so fly?

The last piece is an Hiss Art mural that's just weird and authentic. Kitty cat, kitty cat, where are you? Clearly, MaQ loves 'em. Ha ha! This was on the end of a gray trailer, where the peacock is also displayed around the side, and this trailer is used as a temporary office for workers on the Houston Restoration Project and the 2nd Avenue subway line. The trailer always exhibits new murals, but since we've haven't been around here as of late, and that we've never blogged this section before, what better day than today? :)

Hope you had fun stopping by! Guess who's got a birthday coming up?! My boy is going to be 3 years old on Thursday and I can't believe it! Where does the time go? When you're having too much fun, I guess. Stay tuned for more adventures coming up soon!

Love & xx's,

maQ + suz

Korean Mung Bean Pancakes

One of the things I miss most is my Korean mother's home-cooked meals. She's the one who gets all the credit for my cooking skills, drilling me, at a very early age, that no good man would marry a woman who couldn't cook for him and his family! Though I can make her special dishes, it still just doesn't taste the same like when she used to make it. I sure do miss being in the kitchen with her, listening to her gossip about whatever new talk of the town there was while simultaneously teaching me how to cook.

I've been wanting to expand my horizons when it comes to trying new foods to work with in my kitchen. Since I've been feeling pretty nostalgic about my mom's food, I wanted to do a recipe this week that's not only Korean, but something I've never tried making before! The challenge? Mung beans. My mom used to make Korean pajeon pancakes, but this has a flour, egg and potato base unlike the Korean mung bean pancakes. The mung beans are soaked in water for several hours before grinding it up into a batter.

These Korean mung bean pancakes, nokdujeon (녹두전) aka nokdu bindaetteok (녹두 빈대떡), are rather addicting and relatively easy to make. I would strongly recommend buying the already-peeled mung beans at the store. That was my big mistake. I got the ones that were unpeeled, and had to do the hard, manual labor myself. Talk about torture! Ha ha! Let's just say the peeling alone took me an extra hour (or two...)! But the results were totally worth it.

These savory pancakes are soft and nutty. I used carrots and scallions for my veggies. They give an extra crunch, bring texture to the pancake. I'll warn you now though, they're rather addicting!

Print Recipe

Korean Mung Bean Pancakes

Ingredients

For the Pancakes:

  • ½ cup peeled and split mung beans, soaked in warm water for at least two hours
  • 1 cup water
  • 1 Tablespoon doenjang or brown miso
  • 2 teaspoons sugar
  • ½ cup brown rice flour
  • 1 cup of chopped chives (scallions and leeks are good, too)
  • 1 cup of shredded carrot
  • a couple Tablespoons oil for pan-frying (any neutral-flavored oil, I used sunflower)

For the Dipping Sauce:

  • 3 Tablespoons soy sauce
  • 1 teaspoon sesame oil
  • ¾ teaspoon sugar
  • ¾ teaspoon gochugaru (Korean red pepper flakes) or ½ teaspoon common red pepper flakes
  • 2 teaspoons toasted sesame seeds

Instructions

  1. Rinse your split mung beans and soak for a few hours to tenderize.
  2. Drain the beans and put in a blender or food processor with the water, doenjang or miso, and sugar and blend until the beans are broken up into little bits (It doesn't have to be perfectly smooth). Then add the brown rice flour and blend again just to combine. Pour the thick, yet slightly runny, mixture into a bowl and set aside.
  3. Heat a large nonstick skillet on medium-high heat for about a minute then add 2 teaspoons oil to the pan. Using your fingers, put a mound of chives into the pan for each pancake. Top the chives with another pinch of carrots. Finally, using a tablespoon, put 1 Tablespoon of the pancake batter onto the chive and carrot mounds. Swirl the pan gently to redistribute the oil and cook the pancakes until the edges look browned and crisp. Take a peek under one to see how far along they are. When sufficiently brown, flip the pancakes and cook on the other side until browned. After they are done, transfer to a paper towel-lined plate to absorb excess oil. Repeat the process until you are done with the batter, replenishing the oil in the pan as needed.
  4. Make the dipping sauce by mixing all the ingredients together. Done! Serve with the pancakes while they are still hot.

Notes

-This recipe makes about 20 mini pancakes if you use one Tablespoon of batter for each one.

-Do yourself a favor and buy the peeled, split mung beans rather than unpeeled. It will save you the step of peeling them. Find mung beans in any Korean or Indian market.

-Add anything you want to these pancakes. You can try chopped kimchi, perilla leaves, mushrooms, and peppers. All are delicious.

-This recipe makes thin, but dense pancakes. If you prefer a lacier and thinner version, add another ¼ cup of water to the recipe.

Special thanks to Lands and Flavors for the recipe! I was so happy to come across it on Pinterest when looking to try something new! I know I'll be using this one a lot more often. :)

The dipping sauce to go with it is simply delicious! It's got my three favorite components: it's spicy, a tad sweet and is loaded with sesame!

We hope you try this recipe and share this amazing dish! Come on and try something new! Enjoy!

Love & xx's,

maQ + suz