Doenjang Jjigae

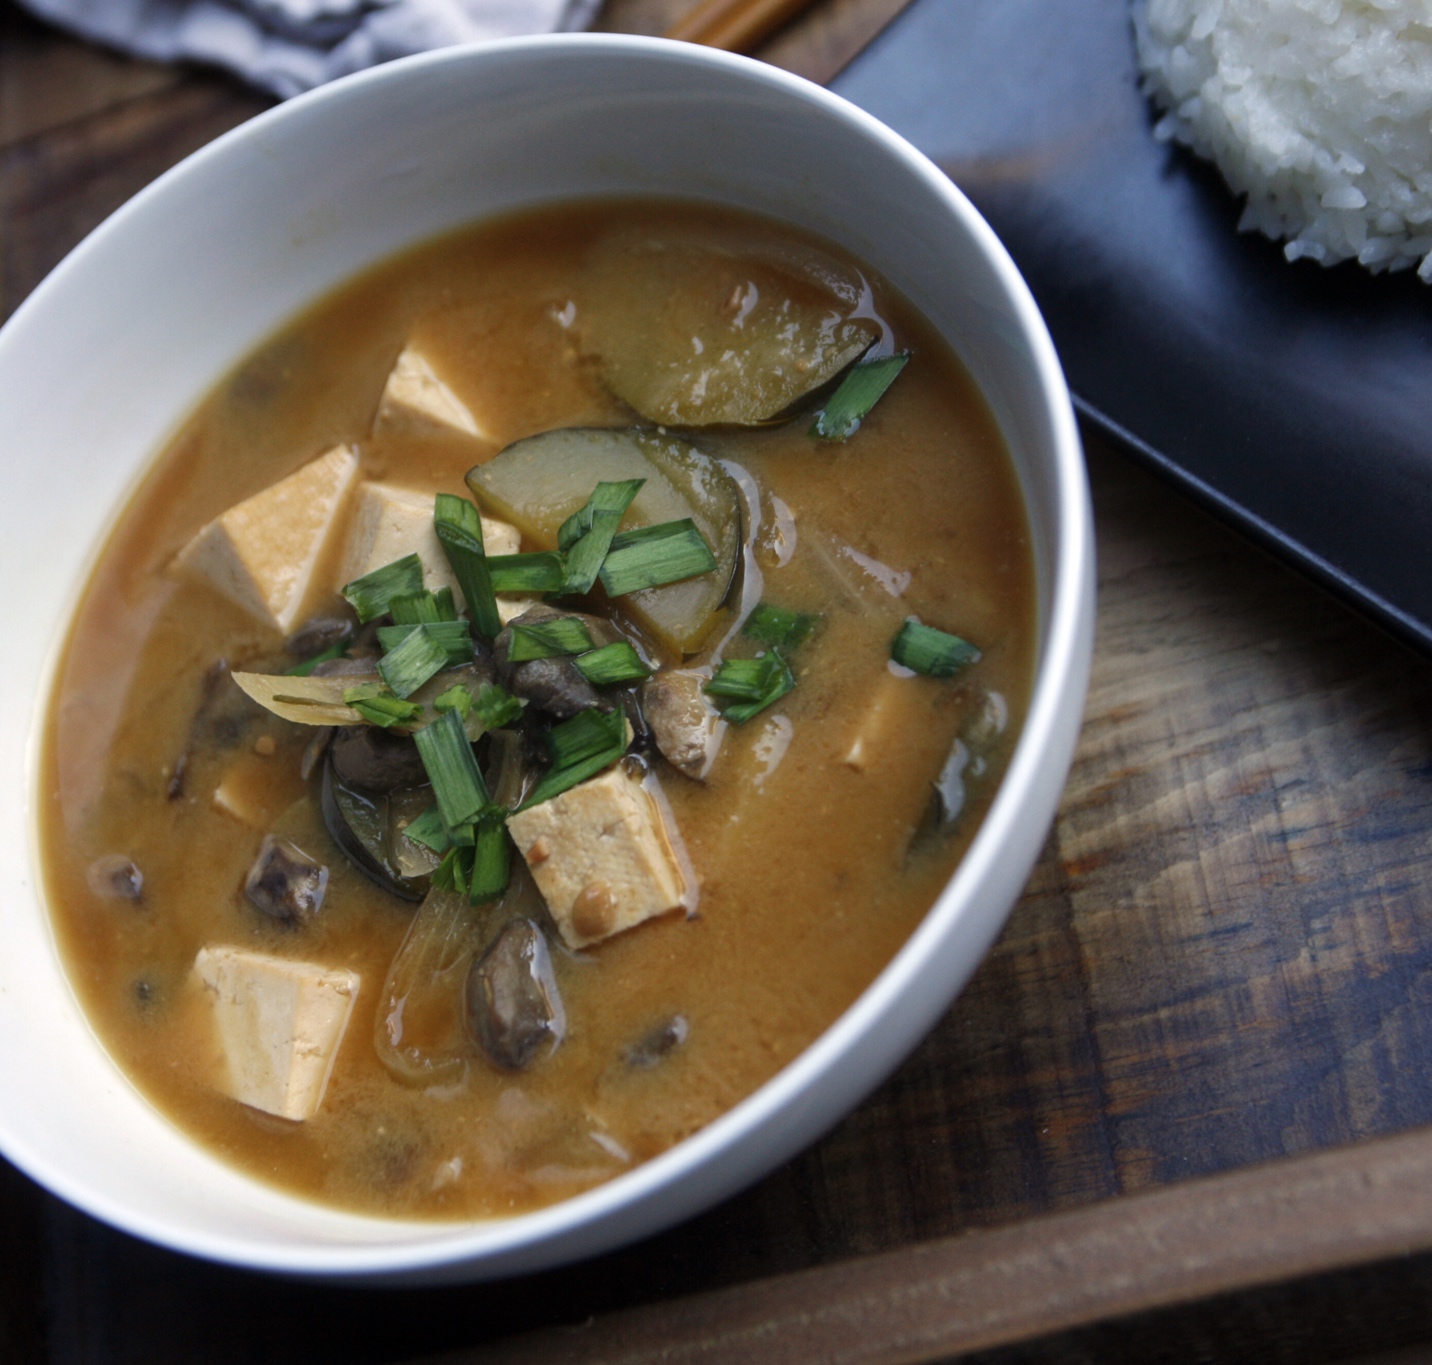
A traditional Korean stew I've been living on since I could eat, I refer this soup as the, 'cure all' mother of all soups. To me, it is one of my go-to comfort foods whether I'm feeling a little under the weather or dreadfully sick, this stews is packed with protein, vitamins and other nutrients that doesn't only do a body good, but is good for the soul. And especially on a cold, end of October, Monday, what's better to warm you up than a delicious bowl of something home-cooked for dinner?


Fermented Soybean Paste Stew (Doenjang Jjigae) Recipe

Makes 4 – 6 servings

Ingredients

2 green onions

1 (12-ounce) package of medium or soft tofu

1 onion, sliced

1 zucchini, quartered

1 (10-ounce) package of button mushrooms

2 Tbsp fermented soybean paste

Water

2 garlic gloves, minced

Preparation

Dissolve the soybean paste in 3 cups of water into a large cooking pot. Stone pot works great for this. *I use a masher to blend the paste in the water more efficiently. Add sliced onion, zucchini, tofu, and mushrooms. Bring to a boil,and then add garlic. Lower the heat and let simmer for about 10-15 minutes. Add green onions and cook for another 1-2 minutes.

Serve immediately with rice, kimchi, and other side dishes (banchan).

There are also many variations to this dish. You can do a kimchi jjigae, one with some kind of meat like beef or pork, or instead of all the vegetables listed, you can opt for only one kind, like Napa cabbage or soybean spouts. During my childhood summers, my mother used to put in the Swiss chard she grew in from our backyard. It was amazing. Still is.

You've got to try this soup! I strongly urge you to eat this with rice though. Especially if accompanied with other tasty side dishes like kimchi. Both the soup and kimchi are on the salty side, and taste too strong without it's imperative sidekick. So don't get it twisted. Don't separate the two! They go along together just like peas & carrots! :)

What are some of your favorite, everyday comfort meals or soups? Something that's easy to make, is nutritious, and doesn't have you slaving over the stove all day long? I love to hear from other bloggers and their food testaments and recipes. Or if there's another fellow Korean blogger who's made the same soup but in a different way, holler at your girl! 🇰🇷

I hope you guys had a nice weekend and an even better Monday. Have a great week!

Love & xx's,

maQ + suz

Roasted Pumpkin Seeds

This week I wanted to cook something Korean again but I had all these pumpkin seeds from the other day making that 'MaQ-o'-lantern'. And just like my father, I LOVE roasted pumpkin seeds! They are quite the tasty snack and I couldn't just let these nutritious lil' gems go to waste! I usually just season them with a little salt, but I saw a really awesome video by Tasty on Facebook showcasing a variety of seasonings! They're all great, ranging from wasabit to sriracha honey, but I went with the pumpkin pie and cocoa seasonings for today.

Directions

Roast pumpkin seeds in an oven at 350F until dry but not golden.

All amounts for 1 cup of seeds.

Seasoning Ingredients (Two-ways)

PUMPKIN PIE: 2 tsp cinnamon, 2 tsp ginger, 2 tsp allspice, 1 tbsp sugar
COCOA: 1 TBSP unsweetened cocoa powder, 2 tsp sugar, 1/2 tsp cayenne

Coat pumpkin seeds in a few TBSP of vegetable oil and then mix in seasoning.

Roast at 350F until golden.

I loved the cocoa pumpkin seeds! Really super delicious! They're not too sweet and the cocoa unearths the pungent taste in the seeds, making it such a pleasant surprise in your mouth. ;)

The pumpkin pie is also not very sweet and is absolutely scrumptious. That's what I like about pumpkin seeds, that they're not only healthy but they are a treat that's not loaded with some God-awful ingredient like high fructose corn syrup or anything that has so much sugar, my heart rate spikes just looking at the numbers! The cinnamon and all spice, along with the ginger and 1 tbsp of sugar is a terrific Fall mix, my hubby tried them for the very first time (he's French, they don't exactly roast pumpkin seeds everyday) and loved them!

They are such a staple Fall snack for me. I'm so happy to have tried different, authentic flavors! It just gets me really pumped up for next month, my favorite time of year with all those incredible Thanksgiving dishes, where I try to create a new dish every year. Can't wait to share with you with what's to come!

I'm really excited to munch down on these later, normally I'll make a bag of popcorn or have some kind of chips and dip, but this is a great substitute and is very good for you! Are you a fan of pumpkin seeds? What's your favorite seasoning for yours? Leave a comment in the box!

Have a fantastic & cozy weekend!

Love & xx's,

maQ + suz

Kimchi Deviled Eggs

Um, I just need to forewarn you that these are highly addictive! And they are super quick and easy to make, which is always a plus in anyone's kitchen! If you're as much of a fan as I am with classic deviled eggs, these are even better with a twist! We got some Korean ingredients in there! That's right, kimchi city here we come! ;)

At first I found the combination of ingredients to be somewhat ghastly! Mayo and mustard with kimchi?! Eeeeek! But after creating these deviled eggs, I found them to be scrumptiously delicious! This is perfect for a brunch, a cocktail party, or just getting together for a casual night in with some friends. It packs a serious punch in your mouth, definitely a Korean party going on in there. Ha ha! Seriously, where's the soju?

Print Recipe

Kimchi Deviled Eggs

Makes 14 deviled eggs

Ingredients

7 large eggs

2 generous tablespoons mayonnaise

2 teaspoons yellow mustard

1/4 teaspoon rice vinegar

1 tablespoon gochujang

1 tablespoon sesame oil

1/4 cup kimchi, roughly chopped

Diced chives and black sesame seeds for garnish


Preparation

Boil the eggs in a small pot for approx. 6-7 minutes. Remove eggs from pot and slowly pour out the hot water. Put eggs back in the pot and fill it with cold water, covering the eggs for about a minute or two.

I have a fun trick to help speed up peeling your eggs. Put one egg in a small glass cup and fill it with water. Shake vigorously up and down and NOT from side to side with one hand holding the cup while the other covers the opening. If you shook correctly, your egg should peel like an orange, very easily and in a circular way.

After peeling, cut eggs in half and scoop out the yolk with a small spoon. Place all the yolk in a bowl and mash them. Then add mayo, mustard, vinegar, gochujang, and sesame oil and mix very well. This will be your filling for the eggs.

Put filling in a piping bag with a fitted tip. Press the bag with your hands to push all of it to the end corner. Make sure to press any air out of the top before you start.

Pipe the filling into each half-sliced egg, until there’s a nice mound over the top. If you’re not feeling up for piping, you can as an alternative, scoop the filling out with a small spoon.

Garnish each deviled egg with kimchi, black sesame seeds and chives. Serve immediately.

My only suggestion for this recipe is to NOT to try and substitute the sesame oil with any other kind (olive, vegetable, etc.) The secret with sesame oil is even a tiny dollop can bring so much flavor, and it is a key ingredient to bring all the other components together. I want to do a blog post on some 'Americanized' kimchi sides, sesame oil yet again, being the main ingredient.

I've been on a Korean kick lately! I'd love to keep posting various Korean dishes, infusing other types of cuisines; American, Mexican, Italian, etc. Stay tuned! Next week's food post will be killer good! I can't wait! Now if you'll excuse me, I have some major eating to attend to!

::Foodie lover at ♥::

IMG_4095.JPG

Love & xx's,

maQ + suz

Apple Pie From Scratch

Okay, don't be too jealous, but for today's lunch, I baked (then obviously ate) a homemade apple pie! Well, not to its entirety! But I did enjoy it with a generous scoop of vanilla ice cream. ;)

It's one of my staple desserts for Fall. And because I am trying to hone in my skills as a baker, I was determined to make this apple pie the best apple pie I've made to date! My weakness has never ever been with the filling. This I can do in my sleep. I have the most difficulty with the pie dough, and making it from scratch does have its challenges. But, just like any other form of discipline, the more you go at it, the better it's going to be every time! I think it goes without saying, I'm pretty happy with the way this pie turned out today! Baking ninja skills successfully improved!  I even gave myself a gold star! Ha ha ha! Kidding.

Does this pie look gorgeous or what?! I baked this bad boy to near perfection! I'm seriously giving myself a good ole' pat on the back because this is the finest pie I've ever made. I can't wait to stuff my hubby with it tonight after dinner!

print recipe

The Best Apple Pie

Yield: 8-10 servings

A simple and delicious recipe for "the best apple pie" -- made almost entirely with a food processor! Recipe from Gimme Some Oven

Prep: 25 mins Cook: 1 hour Total: 1 hour 25 mins

Ingredients:

    1 double-crust pie dough, refrigerated (*see below for recipe*)

    2 tablespoons all-purpose flour, plus more for dusting the workspace

    3/4 cup sugar, plus extra for dusting the top of the crust

    1/2 teaspoon ground cinnamon

    1/4 teaspoon ground nutmeg

    1/4 teaspoon salt

    1/8 teaspoon allspice

    3 large Granny Smith apples (about 1.5 pounds), cored and peeled

    4 large McIntosh apples (about 2 pounds), cored and peeled

    1 Tbsp. lemon juice

    1 large egg white, lightly beaten

    (optional) vanilla ice cream and whipped cream for serving


Directions:

Preheat oven to 375 degrees. Prepare a 9-inch pie plate with cooking spray.

Roll out the two pieces of dough on a floured workspace into large circles, until the larger one is at least 12-inches in diameter, and the smaller one is about 10-inches in diameter. Carefully transfer the larger pie dough to the pie plate by and press it in gently to line the entire bottom of the pan, with the dough sticking out at least 1/2-inch above the rim. Cover gently with plastic wrap and refrigerate.

While the dough is re-cooling, whisk together the sugar, cinnamon, salt and allspice in a large bowl until mixed. Set aside.

Fit your food processor with a slicing disc attachment, and thinly slice all of the apples. (You can also do this by hand with a knife.) Toss the apples with the lemon juice until evenly coated. Then transfer the apples to the large bowl with the flour mixture, and gently toss until all of the apples are fairly evenly coated with the flour mixture.

Turn the fruit mixture, including the juices, into the chilled pie shell and mound the apples slightly in the center. Carefully lay the second (10-inch) pie crust on top of the apples so that it is centered around the bottom crust. Trim the edges of the top and bottom crust to 1/2-inch beyond the pie pan lip. Then tuck the rim of dough underneath itself so that the folded edge is flush with the pan lip. Flute the edge or press with the tines of a fork to seal the pie crust. Cut 4 small slits in the top of the dough.

Return pie to the freezer for 10 minutes. Then remove and brush with the egg white, and sprinkle evenly with a few pinches of sugar. Cover the edges of the pie crust lightly with aluminum foil or a pie crust shield.

Bake for 40 minutes, then remove pie crust shield. Bake for an additional 20 minutes, or until the crust is a deep golden brown and the juices just barely start to seep out.

Transfer pie to a wire rack and let cool to room temperature before slicing, at least 3 hours.

*Here is my favorite all-butter DOUBLE pie crust recipe:

Ingredients:

    2 3/4 cups all-purpose flour

    1 tablespoon sugar

    1 teaspoon salt

    1 cup (2 sticks) cold butter, cut into 1/4-inch cubes

    1/2 cup COLD water


Instructions:

Add the flour, sugar and salt to a food processor. Pulse a few times until well-blended. Scatter in the butter, and pulse 7-8 times to cut in the butter well. Remove lid and fluff the mixture with a fork to be sure that it is not sticking to the sides or bottom of the food processor. Drizzle half of the water over the dry ingredients, then pulse another 5-6 times until crumbly. Fluff the pastry again with a fork, then sprinkle on the remaining water. Pulse 5-6 more times until the pastry starts to form small clumps and looks crumbly. (If the dough completely balls up and sticks together around the center blade, you have pulsed too far!)

Transfer the dough to a large bowl, and use your hands to pack it into a ball, just like you would a snowball. Separate the dough into two pieces, with one just slightly larger than the other (to make the bottom of the pie crust). Knead each ball of dough a few times, then flatten to make perfecly round disks about 3/4-inch in thickness. Wrap each disc in plastic wrap and refrigerate for at least an hour before rolling.

Growing up I mostly watched one of my Aunt's make pies. Baking did not exist in my mom's DNA. LOL! But I began to learn early on some tricks of the trade. But beware! Not all techniques work for everyone! That whole roll your dough out on the pie plate with the rolling pin? Never has done anything for me except having to start all over again because the dough broke. Two key tools I always recommend when it comes to pies is one, COLD ass water (put ice cubes in it to make it extra cold) when making the dough, and WAX PAPER.

I use the wax paper to better stabilize the dough when rolling it out and also when I put it in the pie plate. What about additional toppings? Are you an ice cream gal like me or do you love extras like whipped cream, extra cinnamon, etc?

The aroma is tortuous! Seriously, the smell is intoxicating! I am salivating as I type this! I have to go for seconds, forget about waiting for this pie to cool down! I'm going in...

What are your strategies/tips when it comes to baking pies? I'd love to hear from you!

Happy Monday!

Love & xx's,

maQ + suz

Korean Mung Bean Pancakes

One of the things I miss most is my Korean mother's home-cooked meals. She's the one who gets all the credit for my cooking skills, drilling me, at a very early age, that no good man would marry a woman who couldn't cook for him and his family! Though I can make her special dishes, it still just doesn't taste the same like when she used to make it. I sure do miss being in the kitchen with her, listening to her gossip about whatever new talk of the town there was while simultaneously teaching me how to cook.

I've been wanting to expand my horizons when it comes to trying new foods to work with in my kitchen. Since I've been feeling pretty nostalgic about my mom's food, I wanted to do a recipe this week that's not only Korean, but something I've never tried making before! The challenge? Mung beans. My mom used to make Korean pajeon pancakes, but this has a flour, egg and potato base unlike the Korean mung bean pancakes. The mung beans are soaked in water for several hours before grinding it up into a batter.

These Korean mung bean pancakes, nokdujeon (녹두전) aka nokdu bindaetteok (녹두 빈대떡), are rather addicting and relatively easy to make. I would strongly recommend buying the already-peeled mung beans at the store. That was my big mistake. I got the ones that were unpeeled, and had to do the hard, manual labor myself. Talk about torture! Ha ha! Let's just say the peeling alone took me an extra hour (or two...)! But the results were totally worth it.

These savory pancakes are soft and nutty. I used carrots and scallions for my veggies. They give an extra crunch, bring texture to the pancake. I'll warn you now though, they're rather addicting!

Print Recipe

Korean Mung Bean Pancakes

Ingredients

For the Pancakes:

  • ½ cup peeled and split mung beans, soaked in warm water for at least two hours
  • 1 cup water
  • 1 Tablespoon doenjang or brown miso
  • 2 teaspoons sugar
  • ½ cup brown rice flour
  • 1 cup of chopped chives (scallions and leeks are good, too)
  • 1 cup of shredded carrot
  • a couple Tablespoons oil for pan-frying (any neutral-flavored oil, I used sunflower)

For the Dipping Sauce:

  • 3 Tablespoons soy sauce
  • 1 teaspoon sesame oil
  • ¾ teaspoon sugar
  • ¾ teaspoon gochugaru (Korean red pepper flakes) or ½ teaspoon common red pepper flakes
  • 2 teaspoons toasted sesame seeds

Instructions

  1. Rinse your split mung beans and soak for a few hours to tenderize.
  2. Drain the beans and put in a blender or food processor with the water, doenjang or miso, and sugar and blend until the beans are broken up into little bits (It doesn't have to be perfectly smooth). Then add the brown rice flour and blend again just to combine. Pour the thick, yet slightly runny, mixture into a bowl and set aside.
  3. Heat a large nonstick skillet on medium-high heat for about a minute then add 2 teaspoons oil to the pan. Using your fingers, put a mound of chives into the pan for each pancake. Top the chives with another pinch of carrots. Finally, using a tablespoon, put 1 Tablespoon of the pancake batter onto the chive and carrot mounds. Swirl the pan gently to redistribute the oil and cook the pancakes until the edges look browned and crisp. Take a peek under one to see how far along they are. When sufficiently brown, flip the pancakes and cook on the other side until browned. After they are done, transfer to a paper towel-lined plate to absorb excess oil. Repeat the process until you are done with the batter, replenishing the oil in the pan as needed.
  4. Make the dipping sauce by mixing all the ingredients together. Done! Serve with the pancakes while they are still hot.

Notes

-This recipe makes about 20 mini pancakes if you use one Tablespoon of batter for each one.

-Do yourself a favor and buy the peeled, split mung beans rather than unpeeled. It will save you the step of peeling them. Find mung beans in any Korean or Indian market.

-Add anything you want to these pancakes. You can try chopped kimchi, perilla leaves, mushrooms, and peppers. All are delicious.

-This recipe makes thin, but dense pancakes. If you prefer a lacier and thinner version, add another ¼ cup of water to the recipe.

Special thanks to Lands and Flavors for the recipe! I was so happy to come across it on Pinterest when looking to try something new! I know I'll be using this one a lot more often. :)

The dipping sauce to go with it is simply delicious! It's got my three favorite components: it's spicy, a tad sweet and is loaded with sesame!

We hope you try this recipe and share this amazing dish! Come on and try something new! Enjoy!

Love & xx's,

maQ + suz